decorating with dodi

Follow on Bloglovin

Wednesday, July 31, 2024

Mama Said There'd Be Days Like This...

 Mama said there'd be days like this but, really, two in a row?!! I honestly should have known because I was doing some things that "my heart wasn't really into". I had been looking back at last year's autumn decor and this is the picture that got me going.

 I actually said when I posted that picture that the flag was a bit faded and could maybe use an update like I have done on other flags. And so I did this.


And my thoughts were that I would just leave it there and do a small section at a time. I was going to start on the pumpkin but, when I realized that I would need at least three or four different oranges just for the pumpkin to maintain its integrity and then I looked at the Indian corn and sanity prevailed and I put the flag away. Lol And then I remembered this picture.

This is what the dining room side board looked like last year and all of a sudden my "new eyes" looked at this picture and could see nothing but distortion of proportion. Those two large things on the end with the shorter one in the middle looks really bad. And so, I decided that I would find something to do to hang from the top of the arched window frame to fill in the space and give a nicer visual.

And so I headed to Pinterest and found a pretty picture of a church in autumn printed on a dictionary page and I thought it would be perfect. And so, I quickly downloaded it, printed it and got ready to go. 


I went with antique wax and orange chalk paint for the canvas.


And that is all you will see of that. Apparently I grabbed a piece of recycled computer paper by mistake so when I decoupaged the print to the canvas, it became a mass of wrinkles that I could NOT get out...try as I might. I used every trick I know and nothing worked. I ended up simply soaking the canvas in the sink and peeling off the print and glue.

When I went back to reprint, I found a wreath that looked more "dining room-ish" and, since I had an 8X8" flat canvas as well, I decided to go that route instead. I printed it on better paper, ModPodged it on the canvas and called it a night.


I woke up to this beauty and spent some time distressing the edges and getting it just perfect. But, the paper needed a finish of some sort and since I really am not the biggest fan of the ModPodge finish I thought I could just give this a light spray with my clear acrylic sealer. And so I did. And, apparently I shouldn't have. I'm really not sure why but the whole thing clouded up like it was in a steam bath. I tried to lightly sand off the sealer but that wasn't working and it just seemed to get worse so, back to the sink I went for the second time. And now I had to clear a flat canvas which is really just canvas glued on cardboard. Yikes! This was even worse...and I should have known when to quit but I persisted. I printed another wreath and waited for the cardboard to dry. While it was I stained up some beads and made a hanger and decided to use the "busted canvas" picture in the dining room instead. I'm not sure how I will actually hang it but the 8X8 would have been too small so this is what will be here instead. I'm still not crazy about it but I think it will look better when I get the other two larger things in place for autumn.


And then I went back to the wreath. I thought I had all of the old glue off the canvas but I must not have because this image got some wrinkles as well-and that never happens with the thicker paper. At this point I was pretty much over it all. I still need a top coat so I went with the ModPodge which gave it the shiny look even thought it is supposed to be matte and brought out the wrinkles even more. And then, the distressing wouldn't go on as it should and I couldn't find anywhere to get a decent picture without the glare and let's just say that you may never see this anywhere in my house again-and if you do, it will probably be in a spot that desperately just needs "something". I still think the print is so pretty but the execution definitely is lacking!!


I seriously can't believe that I have spent two days and have so little to show for it-and look at all of the "fun" I've had. Time to clean up all of the mess and call it a day...and, next time listen to my gut when I know my heart really isn't in something. What a disaster. Aren't you glad you visited today? Oh well, things can only get better.  Stay safe and stay tuned to see what comes next.


Monday, July 29, 2024

Update

 Just a quick update on my ornaments. I think I told you I have never used these wood discs before. Now that I have, I will be ready next time. I had no idea there was such a difference in sizes in each bag. If I had, I would have tried to peek in the bags a bit before I bought them. There is also a big difference in how much bark is on each piece. Of course you must know that these variations drove me crazy as that meant that I had to do each Santa just a little differently. Most are OK but there are a few that are not my favorites.

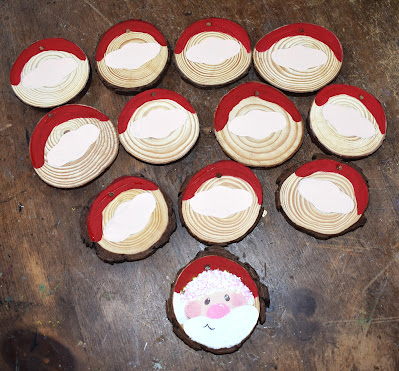
As I said, I set up an assembly line and first did the face and then the hats.


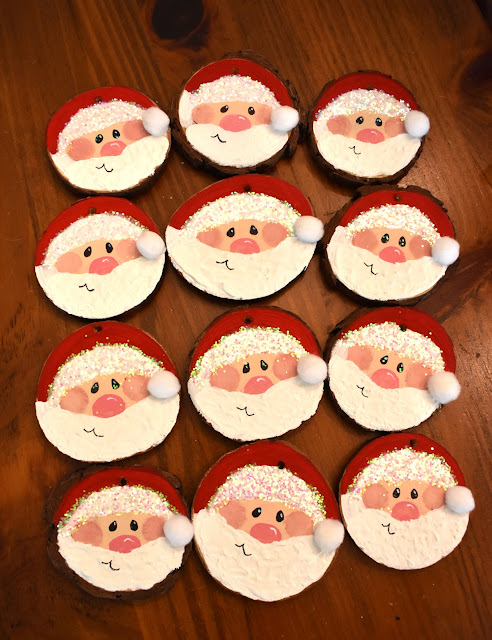
Then I went on to the cheeks and noses before adding all of the white. Since the white was so different on each one, I had areas that I just couldn't get right so I decided to mix some white paint with baking soda and corn starch and see if I couldn't add some texture to the beard. That worked out pretty well and I'm just having to accept the fact that they're all different. I also decided not to use the small silvery pompom and went with a medium sized white pompom instead.


And here is where we are. I'm definitely anxious to get the holly and the bows and finally see what they will look like all finished...but, I have the dogs coming for a week again and then some family coming into town for a long awaited family reunion with grandson #1 as he returns for a very short visit from his first year away at school. Since he is in a military academy, he doesn't get the summer off as most college students do so he has been first in Texas for five weeks and then sailing in the Atlantic aboard the Coast Guard ship, The Eagle. He will be joining his family on their annual family vacation and then coming home for just two days before he flies back to Connecticut to begin football practice and then classes. I haven't seen him since I went to a game back in November so I am getting very excited. 

I'll be back to share if anything fun happens along the way. Until then, stay safe and stay tuned.

Sunday, July 28, 2024

Finally...A Start!

 If you have been around for awhile, you probably know that I like to get some of my Halloween and Christmas things done during the summer when it is too hot outside to do much more and then to give me more time later to enjoy the holiday. But, before I can do that, I have to have some ideas and, of late, ideas have been few and far between. I don't want to repeat something I have done before-unless there is a WHOLE new twist on it-and, since I have been crafting for what seems like forever, I have done most all!

But, I have never painted anything on a wood disc and so, even though I am definitely not a painter, this Santa looked like maybe something I could pull off. And so, on my last trip to HL I grabbed up some of the discs and thought I would give it a try today. I gathered up anything else I thought I might need...and, actually, it was all stuff I already had in my stash.


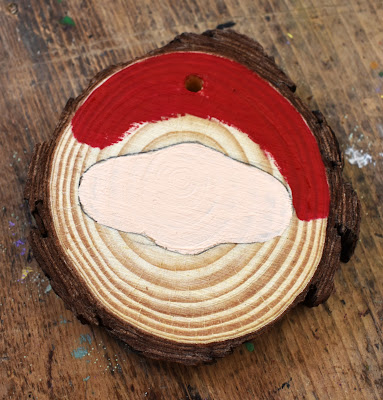
I wasn't exactly sure where I was going with this so I wasn't sure what all I needed but I knew I wanted to just start with a simple pattern for where the face would be so that I had a bit of similarity amongst all of the ornaments even though the wood discs were all slightly different sizes. I traced the pattern and then filled it in with flesh colored paint-and look what the name of my paint turned out to be. Lol This gave me my starting point and then I could freehand everything from here on.


Then I just started painting in the different areas in the order that seemed to make the most sense because most of the white kind of "drifted" over the other colors-hence, white went on last.


I used a little of my Tim Holtz Distressing wax in red because I wanted the cheeks to be a bit translucent.


Then the nose went on in pink before I added the white.


And then I decided to use a pen to draw in the eyes and mouth mostly because they were so small and, since the wood disc is a bit uneven, I thought I might have better control with the pen over the bristles of a paint brush.

I did a little bit of white for highlight and then decided to put some clear glitter on the fur of Santa's hat to delineate it from his beard and hair. And that is where we are right now.

I think I am going to add a sprig of holly but I will need to wait for HL to put out their Christmas crafts and I can find the small decorative holly springs...I just used a little piece of a garland I have so I could get an idea of what it will look like. I am thinking about the glittered pompom for his hat and then a bow of some sort. I used some ribbon I have but I don't have enough for all of them so I guess that will go on my list as well. And, I'm still debating on the hanger. I will probably decide on that after I see it all done.

So this is where I am right now with tweaks to come. And now comes the hardest part for me...making 11 more of the exact same thing. I'm always excited to make the first so I know where I'm headed...and then a few more are OK...but, by the time I'm on #12, I will be over them! Lol I think I'll set up an assembly line and just do a step or two each day. We shall see.


I promised photos from yesterday. I headed over to daughter #3's house yesterday morning. The girls all arrived around 11 and did what teenage girls do when they're getting ready for something special...lots of hair spray, make-up and perfume went around. Then, as girls often do as well, some snacking was in order before they all got into their dresses. They were then going to get picked up by the "celebrant's" mom and taken to the country club to meet up with the birthday girl and do lots of picture taking before the big event started.

None of the girls has ever been in a quinceneara court before so I'm not sure they knew what to expect but, they were excited none-the-less. We had a huge rain storm right as they were expecting to be picked up so that was delayed and my daughter and I got to sit and visit with the girls and catch up on everyone's' summer until the rain let up and they could be off. I am always so grateful that my grand children allow me to be part of these special times in their lives. Somehow these "small" times end up seeming more meaningful than some of the "big" times. I love getting to hear what the kids are thinking and I love when they ask me things and actually want to hear what I'm thinking as well. When I look back on times like this, I realize how blessed I have been to go through these things with the first five of my grand children and how very much I will cherish what is left to come with the last two. I can't believe they're almost all grown up! Sob


Presley with the birthday girl. I'm guessing pink was the color of the night. Lol
 

I'm off to grab some lunch and then get back to painting. Stay safe and stay tuned.

Friday, July 26, 2024

Almost Criminal

 It truly is almost criminal that I am making a complete post about a craft that is sooo simple that I almost feel guilty claiming it. Lol But, since it turned out so cute, I had to show you so you can rush right out and grab your supplies. So, just about an hour ago, this is where I started.


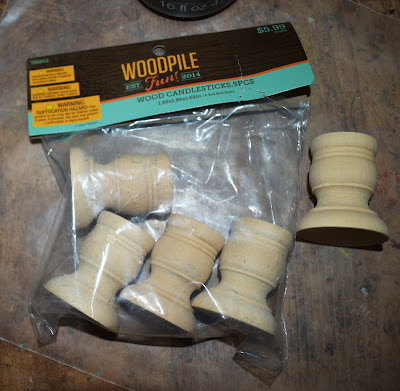
As I said yesterday, I had seen a blogger make this craft so she was definitely my inspiration. But, for her stem she used a piece of tree stem about 2 1/2" wide and drilled a hole to fit her candle into it. She actually purchased the birch stem and only used a very small part of it. First, I didn't want that extra expense and second, I don't have any way of holding the log as I would be drilling and it just kind of seemed like an accident waiting to happen. And so, I decided on candle cups-which HL was actually out of so I grabbed these very similar candle holders and they worked even better.


The first task was to knock off the existing stem. I brought out the big guns and thought I could twist it right off-and, maybe if I had the strength of my grandsons, I could but because the stem actually went down into the pumpkin, I couldn't budge it. And so, on to Plan B. I simply took it outside and smacked it a few times against the edge of my brick garden wall and off it came.


Then I stained the cup and used some wood glue and hot glue to position it right in the middle of the pumpkin.


This looked exactly as I wanted...of course, at this point, I didn't realize that when all was said and done you wouldn't even see much of the stem but....? 

Then the fun began. I found some autumn leaves I had in one of my Rubbermaids-after opening several others first-lol-and used the pick and pip berries that I bought yesterday. And this is where you have to know when to hold 'em-know when to fold 'em. I had so much fun doing this-adding and adding-that I really had to force myself to STOP! I was going to add a few loops of that beautiful velvet ribbon-I am dying to use it somewhere-but in the end, I decide to call it at this point.


I would prefer to have a timer, taper candle in this but the only ones I have are too short so I guess I need to get busy and get some ordered. 

In any case, I really love how this turned out and it was just too easy!


And this is what I am left with and so wishing I could come up with another idea before I put it all away. These colors and things just make my heart happy...hurry up autumn!


So that is it for today. I'm waiting for the pest control tech to get here and once that is done, I'm going to make a cucumber salad and a corn salad and then probably call it a day. After all, it is Fri-YAY!! Stay safe and stay tuned.


Thursday, July 25, 2024

Hi-Ho, Hi-Ho

 Hi-Ho, Hi-Ho, a shopping I did go! Today was the day. I definitely needed a Publix run so I thought while I was out, I would swing by the $TreePlus and HL. I should know better than to be near these places this time of the year knowing how I am chomping at the bit to move the seasons along...and, of course, today was no exception. I will say that the $TreePlus still didn't have much fall out so I was pretty safe in there but, HL, oh my!!! I definitely had to curb myself in the floral section. Even at 40% off, the really nice stems are still expensive so I am going to wait until I actually get everything out to see if I truly "need" any more.

In any case, here is my haul.


I grabbed the tray at the $TreePlus for $5. It is actually quite well made although I won't be using it as a tray but rather as a decor piece for Thanksgiving. The colors are mostly the muted colors of autumn and the tray itself is a beautiful green so I know I won't have any trouble finding a place for it. And, it actually has some presence.

I also picked up a few things to maybe use for Christmas ornaments this year-fingers crossed.

And then, while I saw it-and it was on sale-I grabbed orange pip berries, candle rings, some pretty muted autumnal colored velvet ribbons, autumn spatulas, a bit more lamb's ear for the autumn mantle, some flowers and leaves to decorate the candle holder and some small black candle holders. I'm not sure what I will do with them just yet but they always come in handy to raise something up on a shelf.

And then we have this.


I saw a blogger make a candle holder out of this wooden pumpkin. I loved the way it turned out but I wasn't crazy about how she did it so I think I might have come up with a better idea-stay tuned and we'll see.

And then of course I had to grab this.

And, because I already have so many cutting boards and don't really need this to stay safe for use, I grabbed a few markers and did this.


I love the little bit of interest it adds.

My oldest grand daughter-who is a teacher-asked me to send her some cute photos of her from age 0 to 2. It seems her administrators have asked for them and I'm guessing they are going to do the same thing my daughter's team did when she was teaching which is to post the teacher's baby pictures and see if the students can tell who they are. It's really fun and a good way for students to get to know the teachers for the start of a new school year. I'm off to find the cutest and send them to her. Then it will just be a matter of putting everything I pull out away before I can call it a day.

I think I'll be back tomorrow with pictures if I get that pumpkin candle holder figured out. And then on Saturday I am off to daughter #3's house where grand daughter #5 is in her friend's "quinceanera" party. The girls will all be coming over to do each others hair and make-up before getting dressed for the occasion. I'm excited to get to join in the fun. I'll be sure and take pictures and you know I'll be back to share those too. Until then, stay safe and stay tuned.

Wednesday, July 24, 2024

Decisions, Decisions!

 So, so many hard decisions...and one very easy one! When I last posted, the plan for today was to start painting the sunroom ceiling-something that I have put off for FAR TOO LONG! And, I woke up prepared to do just that. But, I have my little morning routine that always involves coffee and usually scrolling through some of the craft blogs that I follow. Today I was inundated with a relatively new craft idea-although I will say that I saw a crafter do this several months ago and I was interested but somehow just kind of forgot about it. And so today I decided that I shouldn't wait any longer...and, the first decision of the day was EASY...forget about the ceiling and get crafting! Lol

I didn't totally remember how the "busted canvas" was made but I kind of had my own ideas, Still, I looked up a few videos to see how others did it and I decided I might have an easier way. Spoiler alert! As I start this post I am also just starting this craft. There is a lot of ModPodge involved so there is also a good bit of waiting time. As I wait between steps I am starting this post so, that means we will all learn together if my method will work.

I decided I wanted to do an autumn canvas so I started by gathering up some autumn scrapbook papers, card stock and also some tissue paper. I need one print for the top, one for the bottom that will get rolled back and one for the background-as well as a picture for the display area.


I ended up choosing the tissue for the top because it would be the easiest to wrap around the edges of the canvas. And, I already had this image already printed-and it sticks to my new pumpkin and floral theme-so it was a no-brainer. But, picking the other two papers was a bit harder. I knew I needed contrast and pop but didn't want it to be too busy. The first step was getting the canvas covered with the tissue and then when that was dry giving it a good top coat of ModPodge as well.


While that was drying I turned my attention to the image I didn't like the white background it had so I decided to cut it out and back it on a piece of floral paper that had similar colors. I thought I was getting closer but there wasn't enough contrast between the background and image.


And so I brought out my old stand-by-Tim Holtz Distressing Ink-and gave the edges some color as well as a bit of shading on the pumpkin...and that did the trick!


The next step is to choose the bottom paper. This one is a bit harder but I think I am going to go with the "crackle paint" as it contrasts well with both the floral and the darker drama of the tissue. We'll see what happens.

I cut the paper to fit inside the back of the canvas and ModPodged it down. After it dried, I cut through the canvas with first an Exacto knife and then scissors. This was the one step I wasn't too sure of and I think I could have done it a little better. I didn't think I wanted all of the "explosions" to be the same size so I cut my pieces different sizes. When I went to roll them back, I wasn't happy with the results because it left me with an opening that wasn't symmetrical and you all know that that would drive me crazy. I did "jerry-rig" it a bit and played around until I kind of got what I wanted but, if I ever do another of these-and I might actually do one for Christmas, Valentine's, St. Pat's, Easter and the 4th-I will think a little more on how to make the cuts.


I cut the floral paper and glued on the image and then just used Tacky glue to put it on the back. I have seen some crafters who use two canvases to do this and their image is on the second canvas and then they're glued together. I didn't see the need to waste a second canvas. I did end up gluing small pieces of tissue on the inside edges because I was afraid when it was all done you might actually be able to see inside a bit and I didn't like the raw wood showing.


The top left corner is still bothering me a little so I grabbed what I had available and just laid a little bouquet of autumn colored flowers up there to see if I might like that. I think I will wait to see what I have that is actually more "autumny" when I pull out my stuff soon. I might want something there-might even just be a hang tag a few acorns or ???. We shall see.


So again, is this my favorite craft ever? No, but it was fun actually doing something I have never done before and now that I have navigated one, I think I have a better grasp on what to do better next time. And, I think they might be cute for the different holidays-we'll see.

Off to clean up the myriad of things I pulled down from everywhere to get this accomplished. And, as sad as it makes me to say it, it is definitely too late to even think about starting to paint...oh well. Lol Stay safe and stay tuned.


Tuesday, July 23, 2024

That Time of Year!

 It is THAT time of year again. The time that I start getting very antsy and having a hard time focusing. I have so many things to do outside that even when I can spend a bit of time out there, aren't even beginning to get done...and the list grows. But, since it is either so hot I can't tolerate it or storming, I'm not exactly spending a lot of time out there so I am not as concerned about how it looks at the moment. I manage to keep it relatively weed free and trimmed so I am OK with that. The finer details will come when the temperatures drop a bit.

So that finds me indoors and looking for things to stay busy...well, things that I want to do because there are always "things". Lol

And, since I am TRULY finished with sunflowers, I find myself continuously perusing Pinterest or craft blogs for some new ideas for autumn. I really haven't found any more crafts to get me excited so I'm on to thinking about decorating. I looked back over my house decked out for autumn last year and just seeing the colors gets me ready to start the swap...until I realize that we are still just in the middle of July! I did look at some new ideas that caught my fancy so I'm now trying to see how I can fit them into my house. The goal is always to make changes without buying very much new...I have more than enough right now! But, when I do the Pinterest search it seems as if I come up with ideas that are sort of similar to things I have so I should be able to work it out without breaking the bank.

My girlfriend and I took a few decorating courses out at the college many years ago and the instructor was asking us each what we thought our "style" was. It was amazing how many of us-who were totally into decor-could not put a specific name to our style. I found that I can talk myself into liking many different styles and I was stumped. Her advice to us was to buy up many decorating magazines and start flipping the pages. DO NOT think about it. Go with your first, gut feeling and if you like the picture don't stress the details-rip it out of the magazine. When you are done and look back at your stack of pictures, your style will become evident. And she was right. I find when I "pin" things over time to a particular board and then go back some time later, I can see my style emerge. 

Here are a few things that stuck out for me this time.


I do something similar already but I like this one better so I will need to see what I can do.


And this one is so pretty. I actually have that riser and a similar velvet pumpkin-not to mention empty frames...now just to find the space. Lol And, note to self, I need to get out there and cut the remaining hydrangeas before they're too far gone. The heat this summer has totally worn them down!


This is simple enough and a good idea for all of those velvet pumpkins I made and never know what to do with.


And, when this one flashed by for a moment I actually thought it was my mantle from last year.

I added the flowers when I made the small pumpkin flower arrangement that sits in the TV unit. I thought the flowers on the mantle would draw the two areas together a bit more. I think I might add just a few more drooping leaves to the mix this year.


And I'm kind of thinking both the new canvas and the small "oil" painting from HL will probably find their way out to the TV unit as well.


 It is really taking every bit of strength I have not to start dragging out my autumn decor. I'm thinking maybe I should FINALLY start to repaint my sunroom ceiling. By the time I finish that it will probably be more than time to start the swap out as ceiling painting is not a favorite of mine and I am sure I will drag it out. Lol

In any case, those are my thoughts for today. I like to start my decor planning like this because once it actually starts happening, I don't want to spend time deciding where things are going and what is going to change-it is always full steam ahead! Stay safe and stay tuned.