decorating with dodi

Follow on Bloglovin

Tuesday, July 1, 2025

Ahhhh!

 This was happening at my house and the temperature must have gone down 20 degrees in here! Lol


I happened to be looking back at last year's autumn decor and I realized that after coffee staining one of my velvet pumpkins that I made so many years ago, I decided that before I decorated this year, I wanted to go back and stain them all. When I made them, the only velvet I could find locally was a very bright one and I like my tones a bit more subdued these days. And so, I mixed up some of the very inexpensive instant coffee that I buy only for crafting and started painting it on. The change is subtle but it definitely knocks down the brightness.


They do get pretty wet as the velvet soaks in lots of the coffee so I ended up letting them dry overnight in the sunroom windows and now I have this bundle of beauty. Oh...if only the rest of the house was dressed in those colors right now!


And, of course, that got my mind going. I'm really not sure I want to use peat pots again on the living room shelf but, until I get everything out-which won't be until the end of August-to see what I have or what the stores will be putting out this year I decided to go ahead and make some up so I will be covered "just in case".

Since I already have all of the supplies I need, I came up with a few different ways to fill the pots but in the end I went with using a pumpkin image as the filler. I might change this up by putting in a small faux pumpkin if I can find any that look realistic and then decoupaging an image on the front of the pot...we shall see. I think HL has their autumn out already so there will be a trip there soon to see what's happening in the craft world for this season.


I used Waverly "pumpkin" chalk paint on the peat pots. I was prepared to tone them down a bit with either the "plaster" or a dry brush of the antique wax if necessary but I liked the color the pumpkin dried on the pots so no extra steps were needed. I did hit the top and bottom edges with some walnut distressing ink when they were dry...and then just a few random swipes on the body of the pot as well.


While the distressing ink was out I hit the edges of the images and then hot glued on a piece of a dowel so I could insert it into the floral foam that I filled the pots with-as well as some shredded paper.


I wasn't sure what I would do next but I felt like it definitely needed something so I found a bag of  small autumn leaves that I have had forever. I just used a big "glob" of Tacky glue on the back of each leaf before dropping them on to the top of the shreds. I really just thought this might be a temporary fix until I came up with something better but, I surprised myself by how much I like the way it looks. We'll see if anything comes down the pike that I like better. Lol


So now I am off to clean up a few things before calling it a day. Daughter #1 comes tomorrow to stay through the holiday and, honestly, I really have no idea what the 4th will bring. Our weather predictions aren't great but, since the two remaining "kids" will probably be off with friends at the lake or beach for the day, we adults won't be worrying about fireworks or the like. I'm guessing we will do a bar-b-que at daughter #3's house but since they all literally JUST got home from two weeks in Europe, they're all still totally jet lagged and not ready to think about plans a few days away. We have plenty of time to make a grocery store run if we need to and whatever we do, I know we will enjoy just being together.

I want to post one of the pictures I saw of grandson #1 as he is back at the Coast Guard Academy this week and now that he is a junior, he is a cadre over the latest class of swabs. The cadre is kind of like a drill sergeant and their job to to pretty much stay on top of all of the newbies for the next few weeks. I remember when Harrison was a swab. It is a difficult time because they can have no communication with home but, there is a photographer with them at all times taking and posting lots and lots of pictures and families play "where's my Waldo" all day long making sure they can see their loved one's face. Of course, this also works for us now because the cadres are in a lot of the pictures so I am constantly perusing the site. Of course now Har can communicate and we know he's fine but I still love seeing his sweet face. Lol

I got a message last night right before the first pictures of this summer hit. It was from my grandson preparing me that I would be seeing him yelling at the swabs but making sure I understood that that was his job and he was bein evaluated on his leadership skills as well. I'm sure none of this comes easily to him because he is just such an empathetic kid but I know he will find a way to make all of the swabs feel welcome and know that what they are going through will only serve to make them stronger!

In this picture, he is just getting them started on their marching skills and his voice was so strong and assertive that I had to laugh-left, left, left right left. If they only knew what a softie he is! Lol Stay safe and stay tuned.


Sunday, June 29, 2025

Here We Go Again

 Why can't things be easy? I'm having another one of those days where I have a plan to tackle a bunch of "simple" things on the list until the storms arrive yet again. And, as happens so often, the simple is anything but!!

Let's start with a new mailbox. One of the screws holding in the door of my beautiful mailbox rusted and the door no longer worked as it should. I knew it wouldn't be long before the mail carrier left a note telling me to do something so I was confident I could just find an appropriate size screw/bolt and get it replaced rather easily. Nope! I won't go into the logistics of it all but that was not going to be possible so, when daughter #2 was here yesterday, she and I made a quick trip to Lowes.

Of course, they no longer have my rubbed bronze/copper mailbox so I found one as close as I could. It is rubbed bronze but nowhere near as large as my previous box...or as "pretty". In any case, we brought it home, storms came up and I sent her on her way before she had to drive through all of that and assured her that I had installed my previous box so this would be no trouble for me.

Fast forward to today and I actually read the instructions and saw where it said "hardware" included with your mailbox...except, I missed the small print..."hardware included with your mailbox POST". Now, I do have a nice post but, it has been there for a number of years. It is nowhere near needing to be replaced BUT, I did remember that when I put on my last mailbox it didn't fit with the hardware included because it was so large and I DID have to jerry-rig it. Of course, that meant that said hardware could now be anywhere. Believe me, I looked but no luck. So back to the next jerry-rigging I went. This mailbox does have holes that match up with holes on the side of the post plate but, it says to use a certain size bolt. Well, I feel like Goldilocks. The one that I have is too small and just slides in and the next size up-that I swear is not more than a 32th of an inch larger-is too LARGE! I must have tried 100 bolts just "hoping" but, in the end, the storm clouds started rolling in so I did what I do best-I shoved the too small bolts into the holes and loaded them up with E-6000. I'm pretty sure that will serve my purpose for a day or so until I can get back to Lowes and see what I need.

And, before the rains came, I grabbed my new toy-the reciprocating saw-and headed out to cut up more of the 2x4s. I swear no matter how many I cut, the pile just didn't seem to be getting any smaller but, I persevered and "got 'er done"! Lol I will say that each time I use that saw I am more comfortable with it but it definitely does a number on your shoulder! I have found a way to balance the wood so it doesn't shimmy as much and that has definitely helped as well. Now all I need to do is put a bit in the garbage each week until it is gone!


So now it is VERY dark outside-kind of ominous feeling and I am once again thinking ahead to my next swap...and then the next after that. Am I the only one already ready for autumn? I think my blood pressure dropped 20 points when this arrived yesterday.


I really hate to wish my life away, but as you must know by now, I am NOT a summer girl! I do enjoy being outside but not in our summer heat...and, I do enjoy my pool but not with thunder storms every afternoon just about when I am ready to head in! I will now stop complaining because this magazine gives me the hope I need to push through! Lol

As I write, this is next to me and all that I have so far to add to my next two "decors".


I had one more of my current favorite frames left so I printed this pretty pumpkin image and put it in it. My autumn decor is mostly pumpkins and autumn leaves so this image totally fits the bill!


So that's all I've got for today. It is still pouring down rain out there but the lightning seems to have tapered off a bit for now and, we didn't lose power so I think I'll go look for a movie and enjoy a cozy afternoon before we start a new week-which, by all accounts, looks to be even more wet than this last one. Oh goodie! Lol Stay safe and stay tuned. 


Friday, June 27, 2025

Thinking Ahead!

I woke up to a dreary day with the possibility of rain so I just wasn't in a hurry to work outside. Of course, I wasn't in a hurry to do anything on my inside to-do list either so I had to scramble. I have been thinking of my next decor swap which will take us to my late summer decor-mostly sunflowers and citrus. I knew that I didn't have anything for the "new" shelf in the living room and my mind went to the peat pots that I have been doing. I knew I didn't want to do a vintage one with ephemera (like I did for St. Patrick's Day and the 4th) because the sunflowers just don't lend themselves to that. But, I could go the route I took for Easter and spring:


I was just about to start looking for some sunflower images when I remembered this"


That is a glimpse into the doors of one of the armoires in a guest room thrown open to see so much of my "sunflower" decor. As new armoires and cupboards have joined my house I have been able to store my seasonal things with all of the things that are displayed together. This has made my life so much easier as I change decor monthly. If you look closely, these two shelves house all of the sunflowers, other faux flowers for this theme, plates and napkins, candle holders, dish towels, soap and dish detergent, wreaths, painted vases and on and on. There is another cupboard that houses all of the gold and yellow candles. I think that pretty much covers this swap as a lot of the other decor has a  Mediterranean feel and is stored with my everyday stuff in the garage-many of my urns, olive jars, etc. come out here. In any case, I knew I had some small sunflower picks readily available. Of course, that meant that I would be borrowing from Peter to pay Paul because they are used in the painted Mason jar but, hopefully, HL has more this year and I will be able to replace them.

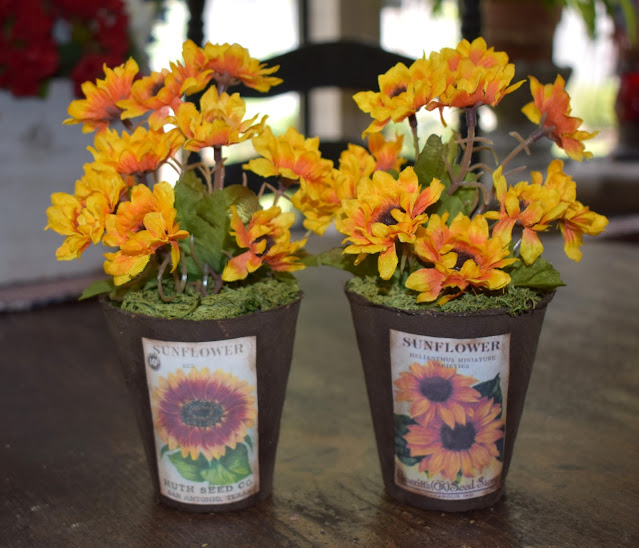
And so, I gathered supplies. I decided that I wanted to use these flowers with vintage sunflower seed packets. I found two pretty similar images and sized and printed them.


I wanted the peat pots a dark brown so I used Waverly antique wax and it did the trick.


Then I just used Tacky glue to put the image on front and filled the pots with some floral foam topped with reindeer moss.  


After that I just cut apart the flower picks and pushed them into the foam and then hit the edges of the packets with a bit of distress ink...and, voila!


I am glad that I did something a bit different for this month. Of course, I still have no idea what will go in the middle cubby between these two cuties so we shall see where it goes. the 4th of July is right around the corner so it won't be long before I can start the swap! Stay safe and stay tuned.


Wednesday, June 25, 2025

And That's a Wrap!

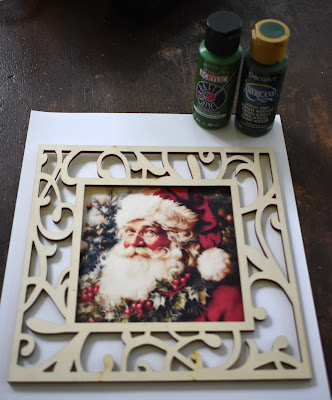
 I must admit that I went back and forth on the frame for the Christmas hanger. I found the perfect round Santa image and got it to fit perfectly in the round frame but, in the end, I went with my gut feeling that the round frame just wouldn't have enough "oomph" on the stand. And I went with my last square frame.


It's hard to tell from that photo but, the picture is mostly a forest green and a deep red so that is where my mind went with colors-not to mention that we all know I am a bit of a "purist" and those are just my normal colors for Christmas decor. I wasn't sure which way to go but, in the end, I decided on green for the frame. I hardly had any of the correct green paint left in that jar and was just about to try to mix up some more with a more green green and some black when I realized I could make my life extra easy if I just watered it down a lot. I could kill two birds with one stone-I would have enough to cover the frame and I didn't think I would need to worry about the laser burn on the edges as the dark brown looks just fine with a "stain". And so, that is where I went.


Of course, once I was there I was questioning the lack of "red" until I thought about possibly backing the "empty" filagree with color. I didn't do that on any of the others and I was fine with that but this just seemed to call for something different. I could have just backed the image on a sheet of red card stock but I didn't think I had the right shade of red so I used my paint and created the border. If it didn't work, it would be easy to just cut if off.


But, much to my surprise, I really love the contrast!


Then it was just a simple matter of attaching the frame to the image, making a very simple rusty wire hanger and then backing the whole thing.


At this moment, I am thinking that as soon as I see any small holly with berry sprigs, I will probably add them to the top but, for some weird reason, I might also be OK just leaving this as is-again, no rush on that decision.


As I look closely at this, those wet glue spots are driving me crazy. If they don't dry clear, I will definitely touch them up. I am actually surprised that there aren't more because, just as I had all of the glue applied all over the back of the frame, my phone rang and it was a FaceTime call from my family in Italy. I was so excited to see them and look at the gorgeous views off of their terrace that I just quickly flipped the frame onto the image and let it go.

I will say, for occasions like that, I am so happy that I now have an iPhone and can do facetimes. They've been gone a week and have another yet to go-my oldest and youngest daughters and three of my grand children are back in Europe. They started in Italy and have had such incredible adventures already. Today they head to Switzerland for more fun and then into Lyon, France and then Paris. All of them except my grandson have been there numerous times so they know all of the "things" to do and see and the right ways to do and see them so my grandson is getting the adventure of his life. The girls try not to do the "touristy" things but more the things that appeal to the locals so he is getting a real taste of the countries. He was so excited when he talked to me because he could see the Alps from their Airbnb terrace! Lol I can't wait to visit with him after his return and get his perspective on Europe.

In any case, here I am.


I now have a hanger for each of my decor themes through the year...and I am kind of sad to have it end. I love projects like this and am always kind of down when I have them finished. I did the same with the burlap door hangers, the wood bead garlands, the book stacks and probably others that I'm not remembering. I actually think this has been my favorite. It was so much fun coming up with these and who would ever have thought that a frame that cost $1.25 from the $Tree would have made them all possible!

So that is it for today. I honestly don't have any new craft ideas lined up so I will probably find myself back scrolling through Pinterest pretty soon. I have TONS of stuff still to finish outside but, honestly, even my grand dog doesn't want to be out there in this heat. I was just out doing some weeding and he kept standing by the door to go in. I let him in but left the door open so he could join me if he changed his mind-which he didn't! He just laid down inside looking at me like I was the one who had lost my mind. Guess that long list of to-dos will just have to wait awhile longer. Lol Stay safe and stay tuned.

My buddy keeping an eye on me as I was working on dinner last night.


Monday, June 23, 2025

Hippity Hop

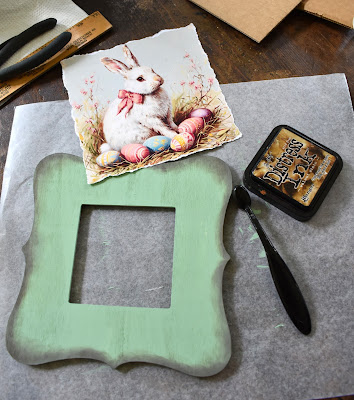
Easter was up next so I found a vintage image I liked and sized it and printed it out. I found a pretty soft green and got the frame painted and then, as usual, I distressed the edges. 


I went ahead and put the cardboard into the opening but, for some reason, I thought the opening may still show through the image once it was on since it is just printed on paper so I found a piece of card stock and cut it just a bit smaller and glued it on the back of the image before ModPodging the image on to the wood of the frame.


Once the image was dry, I distressed the torn edges.


Gathering embellishments was difficult for this one because I felt like it needed to be soft and somewhat in line with the colors of the print. Since I used all of my soft pink flowers-that would have been perfect here-on the Valentine hanger, I pulled the lavenders that I had and then a handful of very thin silk ribbon that I had in my stash. At this point I wasn't sure how I would get it to hang. I felt like wire would be too "stiff" looking for where I was going so...


...I grabbed my trusty Dremel and drilled the hole on the back through to the front. Then I was able to thread the ribbon through to create a hanger as well as a bow on the front.


I really wanted a very soft bow with loops and I got that-sort of. I had to twist the ribbons in order to be able to get them through each other to make the bow. I actually thought I was so smart to think of that but I failed to realize that once they were twisted and tied, the loops would not be able to be opened and "made pretty". I played around with it until I was ready to cut the loops and just go with another messy bow but I stopped myself short of that and I will go with it as is. I ended up just using the lightest flowers I had left and the next time I am in HL I will pick up some more pink ones because I definitely think with the flowers in the image, more pink is needed. Again, it's not like I am in a time crunch so I will probably get to it before it is actually needed. Lol


I think I might have a change of plans for my Christmas hanger. I thought I wanted to use a round frame but that frame really doesn't allow for a large enough image-I'm thinking a vintage Santa-so, I might end up using my last square frame and seeing what I can do tomorrow. I started using my reciprocating saw today to cut up some of the 2X4s from the fence and it was fun so I know I'll be back out there tomorrow again for that and then possibly a bit of weeding because these rains have made the weeds grow like champs. We shall see what time permits. Stay safe and stay tuned.


Sunday, June 22, 2025

Faith and Begorrah!

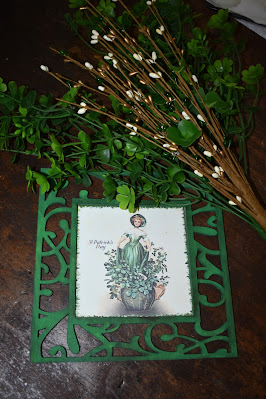
 I guess I was on a roll and just couldn't stop. I actually found a St. Pat's image that was square, had shamrocks and said "St. Patrick's Day" which is just about everything I look for when I'm using these frames so I resized it and got to work.


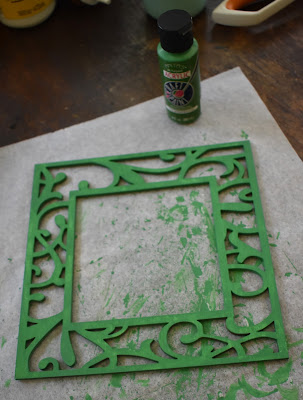
 I painted the frame green-it's not as bright a green as it looks in these pictures-and then went with the usual walnut distress ink.


My initial reluctance to doing this hanger was that I wouldn't have any embellishments handy until I remembered that I moved that cupboard out into the sunroom and that it stood empty until I decided to use it to store some of my St. Pat's stuff. And, voila! As soon as I threw open those doors I spied the pip berries and the shamrocks. The shamrocks that I have-except the ones on a candle ring but I am not going to destroy that-are a bit too large but I think when they're mixed with the swirls of pip berries they're acceptable. Since there were gold berries on the branches, I also hit the frame up with a bit of gold Rub n' Buff and twisted some thin gold wire to make a hanger.


And, again, I reserve the "right" to tweak as it gets nearer to the actual holiday when this will make its appearance and new craft supplies become available but, if not, I am good with it as is. 

I've got to run to get some groceries and then I want to roast up a bunch of veggies before coming back to see what I can find for Easter. After that I think all I will have left is Christmas. My plan is to use a round frame for that but since it doesn't "read" as large as all of the others I'm thinking of trying to incorporate some faux pine around the edges to make it larger and I might have to wait a bit to be able to buy what I will need. I have some "pine" pipe cleaners but, so far, they're not working for me. We shall see. I saw where someone said HL was beginning to put out Christmas. I haven't been to mine in a bit but maybe this can actually happen sooner rather than later. Until then, stay safe and stay tuned.

Saturday, June 21, 2025

Heart Day

 I almost called this "My Heart Wasn't In It". Lol When I am crafting, I can almost always tell if I am doing something I am going to like or not. I like Valentine's Day but it is definitely not my favorite. That being said, I enjoy using vintage images for this day and really thought I wouldn't have trouble finding ones I loved.

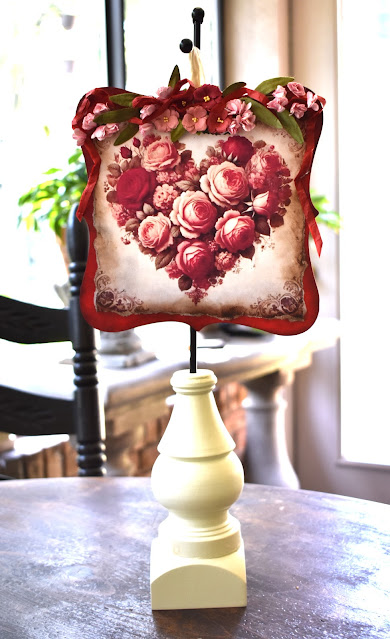
Since I have done many Valentine crafts in recent years, I guess I have already used the images I like the most. Also, when looking for images for these frames, it is just easier to find ones already square. I know I can resize and cut any image but so many of them lose their meaning, borders, or whatever when that is done. I also wanted something a little romantic so, in the end, I went with this.


 I filled in the opening on the back of the frame I chose to use with a piece of thick corrugated cardboard and the one on the front with a thinner piece. Then I had a burgundy kind of red paint so I painted the frame with that and ModPodged on the image before adding my usual walnut distress ink.


 Next came the embellishing and, I will confess, this thing went through many iterations. I don't have a picture of the first but I made a "many looped" bow with my cream silk ribbon as well as a ribbon hanger and then added some flowers. No matter how I tried, I couldn't get that thing to hang straight so I cut the loops down and had a "messy" bow-which I use often.


And, as I look at it now, I guess that would have been OK but it just wasn't doing it for me. And so, I took off the ribbon and added more flowers and called it a night as we were having a torrential thunder storm with hail pelting my sky lights so hard I honestly thought they were going to crack and, well, this was the least of my worries at that time. Lol


The hail thankfully didn't last as long as the storm-which went on until about 10PM-but, we lived and as far as I can tell, there was no damage.

But, somewhere during the night, my mind did go back to this and I knew I wanted it to read a bit more romantic and I thought of ribbon. First thing this morning I hit all of my ribbon stashes that were easy to get to but I could only find thin ribbon that was very RED and not the hue I needed. But, I did happen upon this roll of "paper" ribbon that was perfect in color. I knew it wouldn't drape as nicely as soft ribbon would but I gave it a try. I also added more flowers and I got this:


That is definitely closer to what I was thinking so, for now, I will stop here. 


I think I am going to try St. Pat's but I'm almost afraid to start. My mind is already thinking that I am going to want to embellish with shamrocks and I know searching them out will be a challenge. They're stored somewhere in one of the many Rubbermaids I have for that day...or in a cupboard...or under a bed...or well, you get my predicament but we'll start and see where it goes. Lol

Stay safe and stay tuned.