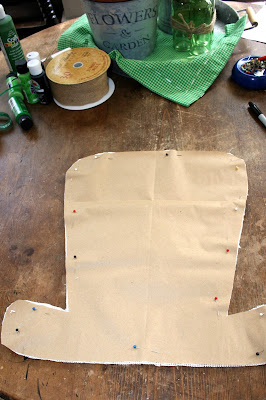
I started with some images from Pinterest that I liked. and then I free handed a pattern on some kraft paper, cut it out and then cut it out of the burlap.
This is where I started to do some of my own ideas. Because this burlap was so light, I decide to give it a coat of black spray paint to have as a base. Now that it is all said and done, I might actually have given it a second coat because I think it might have "sealed" the burlap a bit more so that it wasn't so porous for the paint. After that, I added the buckle and then the band so I would know what area was left to paint green.
The burlap really absorbed the paint. The green on this hat used almost an entire 2 oz. bottle of craft paint and I ended up using a cheap chip bristle brush with the bristles cut way down to "scrub" in the paint. This was the best way to get a full coverage so I didn't need to put on a second coat. I also quickly realized that I should put some waxed paper under the hat instead of just newspaper. The paper was getting very wet as the paint bled through and I was losing a lot of paint to the paper. The waxed paper kind of let the paint bounce back onto the burlap. I also realized that if there are any wrinkles in the burlap, they should be ironed out before you start. I didn't do that and ended up coming back after the hat was painted with the black paint. The iron had to be pretty hot to press the burlap and then it started to melt the paint. Much easier to do it before any of the painting fun starts.
I wanted white polka dots on my hat and the first thing I looked for was to see if I had the right size paint dabbers - I didn't. Then, I cut a circle out of a sponge and dipped it into white paint but it was way too hard to maneuver without a handle. Luckily, I thought of my circle cookie cutters and they did the trick. I just used the cutter for an outline and filled them in with paint using a stiff angled brush.
I liked the image I had found with the black and white border, so that was next. I think it is very MacKenzie-Child-esque.
When the paint was dry, it was a simple matter of hot gluing the seams and stuffing the hat with plastic bags. Other stuffings could be used but I thought since this hat was to hang outdoors, the plastic would be the best. I had fully intended to sew the seams but after realizing how badly the burlap frays, the glue was a much better solution.
Look what I found. I remembered that I had used some black and white polka dotted ribbon and sure enough, I found it in my Halloween stash. Now it was simply a matter of pushing through some black wire for the hanger and making a bow.
And, voila, it is ready to hang on the door. I am so glad I tired this out before my girl friend and I got together. I definitely have a few other supplies I will get to have on hand. We are doing one for Easter so I am thinking an egg or a bunny. We shall see. Stay tuned.


Nice post. It is really fantastic. I liked it a lot. Thanks for sharing the post.
ReplyDelete