decorating with dodi

Follow on Bloglovin

Wednesday, April 30, 2025

Apologies!

I must apologize. Today I actually got up and out and took almost all of the rest of the spring decor pictures that I needed but no amount of editing can make them right. One of the last times my sister-in-law was here I asked her to look at my camera (she knows SO much more than I do about the intricacies of a "real" camera) to see if I had it on some wrong settings because I just couldn't get as good a picture as I thought I should with my camera and I thought maybe my eyes were seeing things differently. She thought everything looked right and advised me to maybe get a new san disk because I tend to delete pictures and just keep reusing the same one and she thought that would probably affect the quality of the photos over time. I then googled it and she is right. Unfortunately, even though I have a disk sitting on my bar next to my notepad to remind me, I have repeatedly forgotten to buy a new one and today-whether it be the disk or my eyes, I could not get a decent picture even with lots of editing. So, I called it quits and on my next visit to any store that carries them, I will pick up a new one and see if that is the culprit. Until then, I will refrain from any more picture taking with the camera. I know I could use my new phone which takes really good pictures-and, my grand daughters showed me a way to download those photos to my computer which is much easier than the email pictures to myself, open emails and send to computer-one picture at a time way that I used to do. But, I still really prefer taking the house pictures with the "real" camera so we shall see. 

But, since I am here, I thought I would show you how I finished up my "autumn hanger". For this one I decided to once again use the solid frame from $Tree. I gave it a coat of Waverly orange chalk paint and then hit all of the edges with my Tim Holtz Distress Ink. And, again, before I painted it I filled in the opening for the picture with three layers of cardboard so the front of the frame would be flat when I adhered the image.


I ripped the edges of the image and distressed them also before simply gluing it onto the frame. I just used Tacky glue for this.


Then I started to look for the embellishments. I knew I wanted to use another of my HL flowers because they look just the ones in the picture and I thought about possibly digging out some of my silk autumn leaves but I thought they might be too bright so I decided to print another image and cut the leaves from that. I was going to actually just reprint this same image but there wouldn't be enough leaves in one so I would have had to print at least two more and that is a lot of ink and waste. In the end I went with one not quite as perfect as I would have wanted but it gave me enough leaves in one print.


I wanted the leaves to be a bit heavier so I glued them to another piece of card stock and then to give them a nice finish, I gave them a layer of ModPodge. These two things together made the leaves a bit more pliable and I am happy with how they came out.


I cut them a apart and then, after deciding where they would be placed, I hot glued the leaves to the back of the flower. The flower was a bit too bright for the picture so I hit it with a quick swipe of distress ink but because it is some kind of fabric, it took the wax much too well so, since I snapped these pictures, I have gone back and given the flower petals just a quick dry brushing of a soft pink. I once again used the rusty wire hot glued to the back and then covered the back with a piece of scrapbook paper full of autumn leaves.


So that is that for today. I am off to put all of my supplies for these hangers away. The next theme to come up will be Halloween and, even though I am known for being a bit over-the-top for Halloween, even I can't get motivated to think about that in the heat we are having! I will leave that for another day after I've picked up more frames and maybe I'll be motivated to finish out the year as well.

Until next time, stay safe and stay tuned.


Tuesday, April 29, 2025

I'm Back!

 I'm back...and just having too much fun! Once again I have not gotten pictures for our tour. I seem to be just getting up and heading straight to the sunroom-after my coffee of course-to continue on my "hangers". We had a really nice amount of rain last night and so much has greened up again that I should probably be working out in the yard but, try as I try to convince myself of that, here I am!

I felt like the sunflower hanger should be pretty basic-just the sunflower-and I decided on using a stained frame. I didn't realize until I was trying to decide on how to hang this that no two sides of the frame have the same design but, in the end, that didn't really matter.


Because I wanted this to be just about the water color sunflower, it was much too easy. I just trimmed around the image, backed it with some "sunflower" yellow card stock and glued it in place.


Then the hunt begins for embellishments. Because I still have SO MUCH of my scrapbooking stuff, the hunt can be long. Back in the day, I had all of that stuff separated by categories but, the categories were different than those I now have-for example, pages with grands in front of their school at the sunflower garden their mom's class planted, pages with grands in sunflower outfits, etc. I would put the pictures with the different embellishments and store them until I got a chance to do those pages. Fast forward these many years where I realized long ago that there weren't enough hours in a day to do all of those pages for each of my now seven grandchildren and I'm not real sure where all to look for things anymore...never-the-less, I found a few things and because I didn't want to overload this one, I think I found enough.


Those of you who know me probably know that I'm leaning towards the tag with the postcard markings...you know I'm a sucker for anything with script or cancellation marks. Lol My gut is telling me it is too big and not quite right but, it's what I really want to use so, for now, it has not been adhered permanently, just kind of wedged up behind the rust hanger that I felt it needed and we shall see how it fairs after I live with it for a bit. 


So for now...


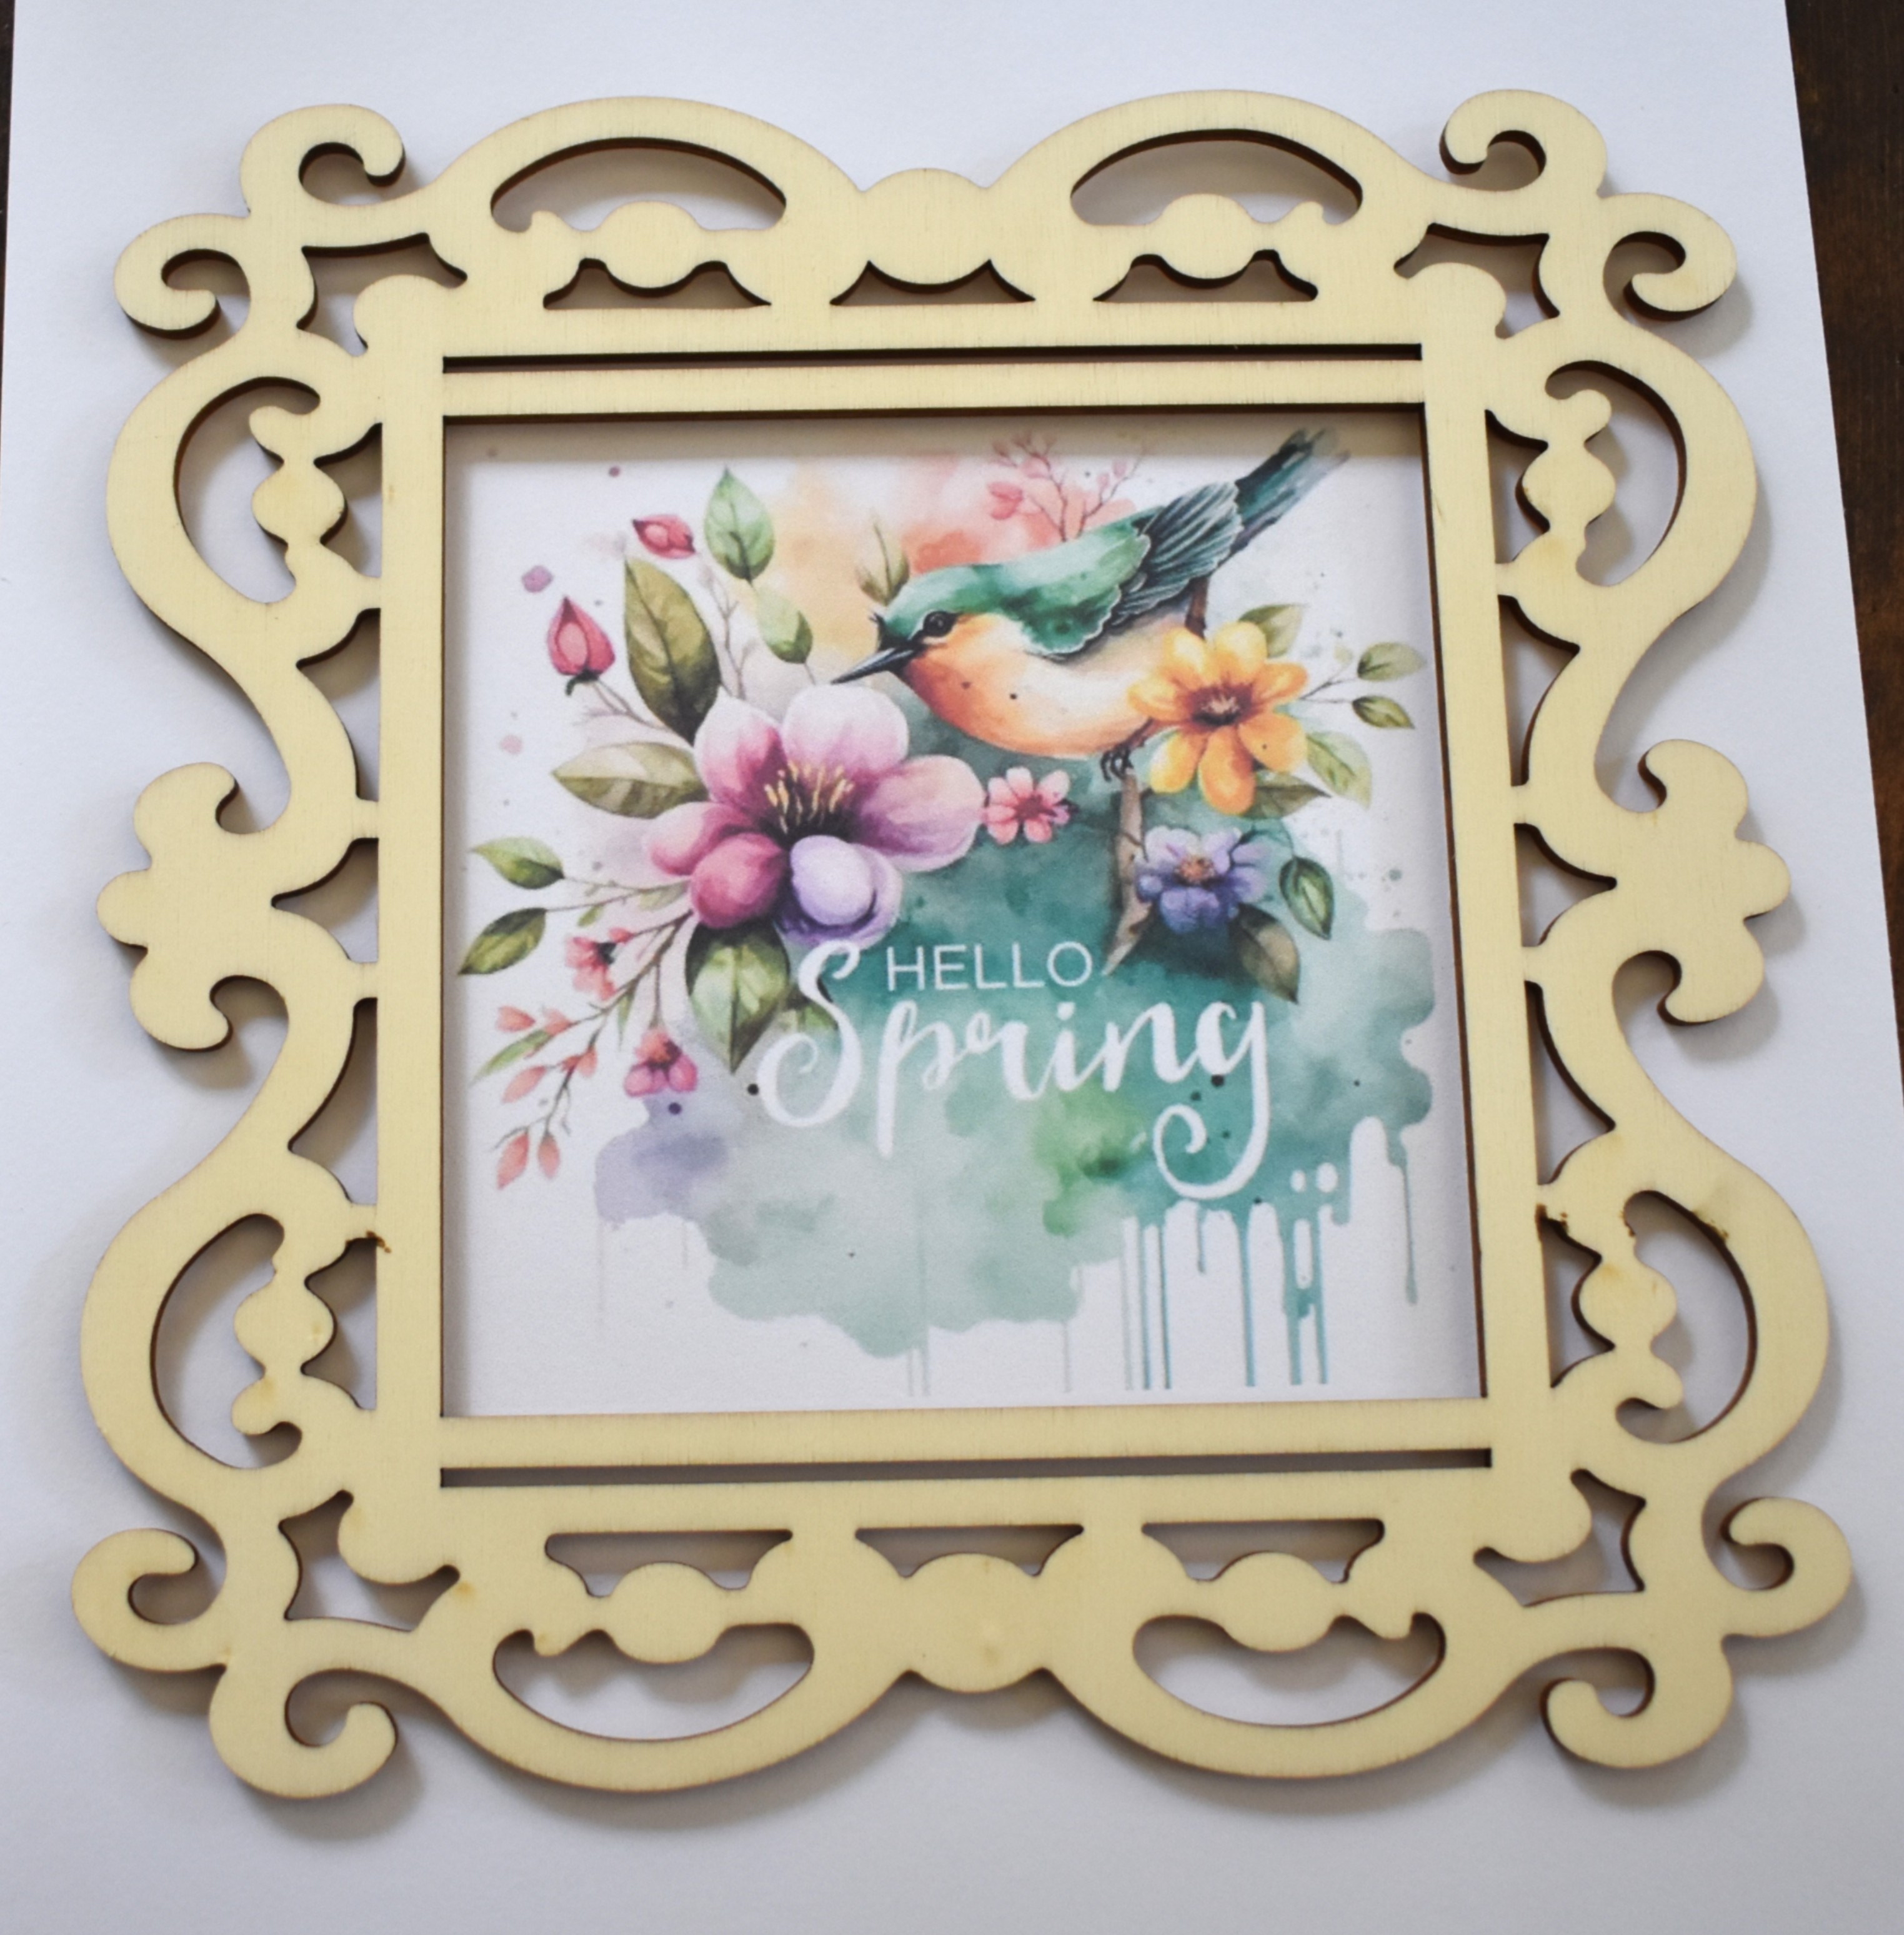
And then I have been playing around with some things in the living room that have been bothering me. First of all, I didn't like the canvas picture on the blanket chest. Once I added the picture on the wall, the colors switched from the teal to more green tones and it was just standing out too much. And so, I decided to put the bird in the frame picture back there but, it felt too small...so, I stole an idea from the new picture on the wall and grabbed the stack of books I painted green for St. Patrick's Day. It still felt too short so I grabbed an old wooden box and I think I might finally be getting closer. Your eyes now move around amongst all of the darker greens and also the browns that seem to ground everything. We shall see.


Of course, that meant the canvas moved from the blanket chest to the other chest and the color was still wrong over there so it has been repainted 3 times since you last saw it. I am OVER IT. As much as I love the print, if I decide I don't like it here it will have to "sit out" this year's decor because the other parts of the house now have some of the purples and I'm not re-doing any of them. I knew spring decor wasn't my favorite! Lol Sorry-I just saw me in the mirror. Lol


My full size gardenia bushes aren't blooming just yet but the minis are and the house smells just like spring! 


And, I know I haven't shown you the dining room just yet but I'm playing around with a new kind of vignette-for me-and I think I'm liking it. More on that to come.


And now my plan had been to pack up all of the craft supplies from the sunroom and get back to the things that really need to get done...like all of the things I have put off since I started on this "hanger" journey which should have lasted through the year-one decor theme at a time. But NO...I just had to google "vintage autumn images" and this came up.


Oh my goodness!!! That looks exactly like the pumpkin arrangement that I made a few years ago. And, you know that I just had to print it...and probably will soon be back in the sunroom designing it. Lol And, as I was waiting for those to print, I realized that since I started this journey with a "May" hanger, I would still need to go back and pick up Valentine's Day, St. Patrick's Day and Easter before I would be truly finished. I know I don't have enough frames so I should take that as a hint to pack up for now but there is probably another trip to a craft store in my very near future! Lol Stay safe and stay tuned.


Monday, April 28, 2025

Can't Believe It Myself!

I had so much fun creating the hanger for my spring base that I couldn't help myself-I had to move on to 4th of July. I knew I didn't want to use one of the "frilly" frames because I wanted to go vintage so I grabbed one of the plain wood frames I also picked up at $Tree.


 When my sister-in-law gave me the base as a birthday gift she said that the things they sell as hangers look like things I have made with decoupaged napkins so I grabbed one of my favorite 4th napkins and then I also found a free image that I downloaded of that sweet vintage girl! I truly wasn't sure which way I would go so I prepared for both!

I first cut some squares of cardboard to fill in the area of the frame where the picture would normally go so I could decoupage over it if I wanted to. I also cut a piece of card stock to use as a base.


I think I must have known that I was leaning towards the vintage print because I decided to go ahead and paint on a flag facsimile. Thankfully, since I love vintage, I can get away with lots of imperfections-and I am good at imperfections! Lol I am not a "measurer". I just kind of go with the flow so it's always a gamble as to whether or not things will work out. Once the blue dried, I used the NEW white paint pen that I JUST BOUGHT to draw stars on to the blue field and that darn pen just wouldn't work correctly. Try as I might, I couldn't get it to fill in smoothly so I just painted over them and drew on simple little stick stars. Not my favorite but once I distressed  it, it was OK.


Isn't she just beautiful?!


Then the fun begins...so many embellishments to choose from. I was going to use that Tim Holtz paper on the back but it is just too pretty to use that way so I ended up just going plain blue-unless you specifically walk behind where this will sit, the back will never be seen anyhow! I ended up using rusty wire for the holder and then made a simple rag bow with red, white and blue ripped cloth and a few pieces of red and blue "fluffy" ribbon as well.


And here she is! I really love this one! Of course now I really need to get going on my house and yard chores but I'm fighting myself not to get started on my sunflower one which will be the decor after the 4th. Hmmmm-anyone taking any guesses as to how this will play out?!


Stay safe and stay tuned!


Sunday, April 27, 2025

Finally-Sort Of

 Once again I waited a bit too long to get the photos going so the sun isn't working with me. I definitely couldn't do the porch because the sun was just glaring no matter where I tried to stand and some of the room photos aren't the best but I want to get going on my spring decor before it has to come down! Lol

I changed up a few things to get the colors a bit less "Easter" springy (with a lot of pinks, purples and yellow) and more toward the "tealy" color I have come to love these days. See if you can spy the differences.


I love that I can drag in a lot of my garden decor for spring. Some of it has actually been out in the gardens over the years and shows the wear and tear of the weather. And, honestly, the more "worn and torn" it is, the more I love it! This slate sign I found in a small little garden shop behind our favorite hotel in Savannah down a street sort of near the river front. I always made an effort to hit this shop as we first started out for our day and I was so sad to see it out of business on one of our trips. I will admit it was out of the way a little so probably most tourists wouldn't see it as readily as all of the shops along the river front but, if you liked to eat breakfast at Clary's Cafe you almost walked right past it. We loved to eat there and stroll the side streets full of beautiful homes and gated gardens along the way.


Both of these old wood scroll pieces came from another of my favorite "off the beaten path" garden stores-this one in Mt. Dora. It was another spot I always hit when we went down there but, alas, it too is no longer in business. I got so many unique things there that it makes me sad to see it gone. Of course these were the kinds of things that would always prompt my hubby to ask "how much did they pay you to take those off of their hands?" LOL


Sorry about the glare. I took this picture so many times with and without flash and with drapes open and closed and none of it helped.


The new picture on the wall really does complement the vignette. It has a stack of green books with a bird sitting there as well as the white hydrangeas and a pitcher. I would like the colors to be a bit stronger-and I'm not promising that I might not one day get in there with some acrylic paint and make that happen but, for now, it is what it is. Of course now that I'm looking at this I'm thinking I need to tone down the color on the canvas.


And, the coffee table just didn't want its picture taken today. Lol The spring book stack is in a wooden brick mold box with its top leaning against the box-definitely hard to see. Then the bead garland is draped over it all with a small bird's nest nestled in the corner.


So that's it for the living room as it is today...never know what tomorrow will bring. I'm off to make some spaghetti sauce using lots of my fresh onions, zucchini and squash that my son-in-law brought over. Once those veggies are nice and caramelized, I add in a large jar of Rao's marinara sauce and that stuff is just so good! It is my knock-off of a sauce that I love at Carrabba's and, I must say, I think I have come pretty close to the original.

Then, I am going to maybe start a hanger for my 4th of July decor. I am having trouble getting a picture to fit...seems every image I like is originally very small and when I enlarge it, it blurs. I may have found a winner-we shall see. In any case, most of the yard work will probably wait until another day because it is already HOT and because it just can!! Lol Stay safe and stay tuned.

Saturday, April 26, 2025

Almost TOO Easy!

 My plan had been to get up today and start taking pictures of the spring decor. Unfortunately, my desire to do some crafting must have taken over because before I knew it, I had supplies on the table in the sunroom and I had started-and, the sun was now in the wrong place for pictures so I guess that will wait until tomorrow.

In any case, this idea played out exactly as I had envisioned only so much easier! The hardest part was picking an image to download and print. I was pretty sure I wanted to use the same color paint I had mixed up for the peat pots and the spring canvas. I love the color and since I had mixed up way more than I needed it only made sense to use it again. Also, I wasn't sure where this piece would end up so I wanted to make sure it would match if it ended up in the living room.


I chose that frame because it was kind of the "laciest" and just felt airy like spring. I knew I wanted a spring image and I thought I wanted it to say "hello spring" and it had to be in the same color wave as my paint and other things I'm using for decor this year. This one fit the bill on all accounts...not to mention that it's watercolor which I also LOVE! And, that frame is the only thing I had to purchase and it was a whopping $1.25!


Next came painting the framed-front and back and choosing the paper to use to cover the back. I started out looking for a solid teal sort of color but then I remembered the floral papers that I have and I think this one matches the flowers in the image perfectly.


Then it came time to figure out a hanger. I was going to use my old standby, rusty wire, but I didn't think the rusty wire worked with either the image or the metal hanger pole so I decided on a soft, fluffy white ribbon. It's a little ethereal looking and I thought it read as "airy and springlike". Instead of taking the ribbon through the hole in the frame I wrapped it around instead in hopes that it would hang nicely-and it does.


And then I found a flower from my HL stash that matches the image perfectly to cover the place where the ribbon wrapped and added three small leaves to finish it off...and, I LOVE it!


For now it is on the table next to my chair in the family room but I don't think it is staying there. I think the green of picture frame is fighting with the green on the spring hanger...we shall see. And, pretend that you don't see that the Yankee Candle is "Summer Wish". I love the color and scent and it is all that I have that will work with spring without going back to lilacs or lavender. Lol

In any case, it has been so much fun and I can't wait to get started on the next-that will be 4th of July and I will probably go more vintage so it will be fun seeing what I end up with! Stay safe and stay tuned.