decorating with dodi

Follow on Bloglovin

Thursday, May 10, 2018

50 Shades of Gray

You are not going to believe what I am about to say....I have a decorator-well, actually two decorators. I am letting someone else make some decisions on my decor! I know, I know. I don't believe it myself.

It all started a few weeks ago. My oldest and my youngest daughters are decorators-and quite good ones. Every post I see about a room or complete home they have done, I LOVE. Now I definitely have my own ideas and I know what I like and I don't like, but I was just mentioning to daughter #3 that I thought the family room could probably use a bit of an update and asked her to think about it. That was about as far as it went until I learned that she had arranged for the whole gang to come for Mother's Day weekend to re-do the family room. And, before that completely settled, Jen was at my door with literally 25-30 jars of paint samples. And, before that had time to process, color was being "swatched onto the walls, wood and fireplace!

In her defense, I did consent to FINALLY painting the wood. It is a long, sad story but long ago, I kind of got tired of the barn wood and decided to white wash it all. It was a tedious project and after looking at it for a few days, I couldn't stand it another minute and I proceeded to re-stain every bit of the wood. That being said, I think it was the white wash effect I didn't like so much. Now that we have tried out some color ( and yes, these are all colors - not white ), I think I will be fine!

This is what my family room has looked like ( at least the walls and wood. The fireplace has gone from used brick to white painted brick to what is now Venetian stucco) for a good number of years. I love the coziness of the wood but I just think it needs an update and short of bringing in a contractor and reconfiguring that horrible cabinet in the corner (which served a purpose when we did it. The circuit breaker box is behind the top part and our TV actually fit on the shelf so the furniture in the room was all turned in that direction) or an electrician to move cable and power boxes so the current TV could be mounted over the fireplace and we could once again have one focal point, paint is the obvious answer. At least budget wise.


We toyed with one color on the walls, another on the wood and maybe yet a third on the fireplace but we kept coming back to the idea of freshening the whole room up and that just seemed to scream LIGHT.


This is just a sampling of the swatches. The rest have already been painted over to give us larger spots to compare. I really was going to go with a dark putty color for the fireplace but in the end, my mirror and lanterns just kind of blended in. Not a good look. I think we may still use it on the door and in the back of the shelves.


I love decorating but I can't tell you how much I could never do this for a living. We were at it for almost 3 hours! The same paint looks totally different on each surface let alone where that surface is in the room. Each time we picked a "winner", it would appear orchid or pink or green in another area of the room. I finally convinced myself that if I went really light it would look like all of the beautiful homes in South Hampton that I see in the decorating magazines. Yep, that's right, just like that!! Lol


Believe it or not, this is only one color. The top on the left and on the left of the right side patches are the color. The bottom on the left and the rightest of the right side are that color at 150% intensity. But look how different they both look from the wall to the wood!


No matter what, it will be a change! And I have finally decided to be like those rich people who live in those beautiful homes. I am going to turn over control to my decorators! Well, at least a little. There will be some furniture moving and editing as well plus, I think, a new rug.I trust them. I think they have a vision...hope I see it at the end. I do know that no matter what I will have the most wonderful Mother's Day because my reasons for celebration will all be here with me-with the rest of the gang thrown in for good measure. And I'll bet we don't go hungry either! Lol Hope everyone has a wonderful Mother's Day and you can bet I'll be back with pictures soon. Stay tuned.

Wednesday, May 9, 2018

And Still They Come!

If you have not read my last two posts, I have been reminiscing about some of my all-time favorite DIYs that I have done over the many, many years that we have lived in our home - 45 to be exact. We bought this house as it was being built and I wish I had taken pictures. Back then we took pictures of people not rooms or food. Luckily, I can see backgrounds of old pictures that remind me too well what this house looked like when we bought it.

We lived right down the street and used to take walks up here every evening after dinner. One night we bumped into the contractor and a deal was struck for us to buy the house upon completion. The only problem was that he was building 3 houses on our circle for the parade of homes and he would not deviate on his plan for what he wanted to present to the public. Our house was supposed to be his rendition of "French Country" although I now know that is ludicrous!

In any case, we had a brand new 4 bedroom home and I was thrilled. Each of our girls had their own bedroom and I set out decorating - and re-decorating!!! Except for a ceiling or two, there is LITERALLY not one thing that remains the same about this house! If you looked at a before and after, you might not recognize it to be the same house! Oh look, I actually found these two sort of decent pictures so you might see what I am saying. We started here:


And ended here. If you look very carefully to the far left, you can see where the garage is now. Sorry but the sun is brutal out there right now and you know I'm not the most patient person. Lol


But, I digress. Not sure how I always end up down that "road" but anyone who has not known us for the last 45 years thinks I am exaggerating when I tell them about the differences! The list goes on forever: new windows, new driveways, garage now familyroom, fireplace added, new garage, new roof, hardwood floors in living areas, slate floors in sunroom, patio to screened porch to sunroom and office addition, pool, gazebo, brick sidewalks, new finish on house (brick on front-stucco on other 3 sides), kitchen reno, both bathrooms renovated, bay window added to the master bedroom, appliance changes several times, changed all plain interior doors to paneled doors and knobs to levers, color changes many, many times...and then all of the new wood finishes (crown, base, door and window trim) and the extra decorative touches!!! I have touched EVERY square inch of this house. It may not have all of the lovely new things that the new "McMansions" have, but it is home and I love it.

And so, I guess that is where I started this post -three posts ago. Lol I do have a few more favorites to share so let me get off of my soap box and move along!

My brother and sister-in-law are always good sports when I get a "bee in my bonnet" and know I'm going to do "it" but just need some help with the "heavy" lifting-and measuring!!

Another favorite that makes me smile every time I walk in one of these rooms is the addition of the wood moldings around the windows and doorway. I know this project can be done with beautiful trims...but, have you ever priced those trims? Not to mention the fact that it takes WAY more footage than you would ever dream. And so, with me being on a tight budget, Pinterest has helped me learn less expensive ways of getting the same effect-sort of.

I always wanted wood trim around our windows and doorways. Every time we added on a room, if a window was involved, we had it installed at the time. But, we never went back to the living room or dining room. So one day...and the rest is history. We simply bought inexpensive 1X4s and 1X2s and with my SIL's measuring once technique, we got the impact I wanted. It is not a difficult project at all but takes some thinking ahead...again, so glad my SIL was here! On this one, I will admit that my brother and I were kind of "dumb and dumber" But, we were cheap labor so in the end, it all came out!


I don't know how something so simple can make me so happy. I think it just might be the pop that the white paint gives the window against the wall.

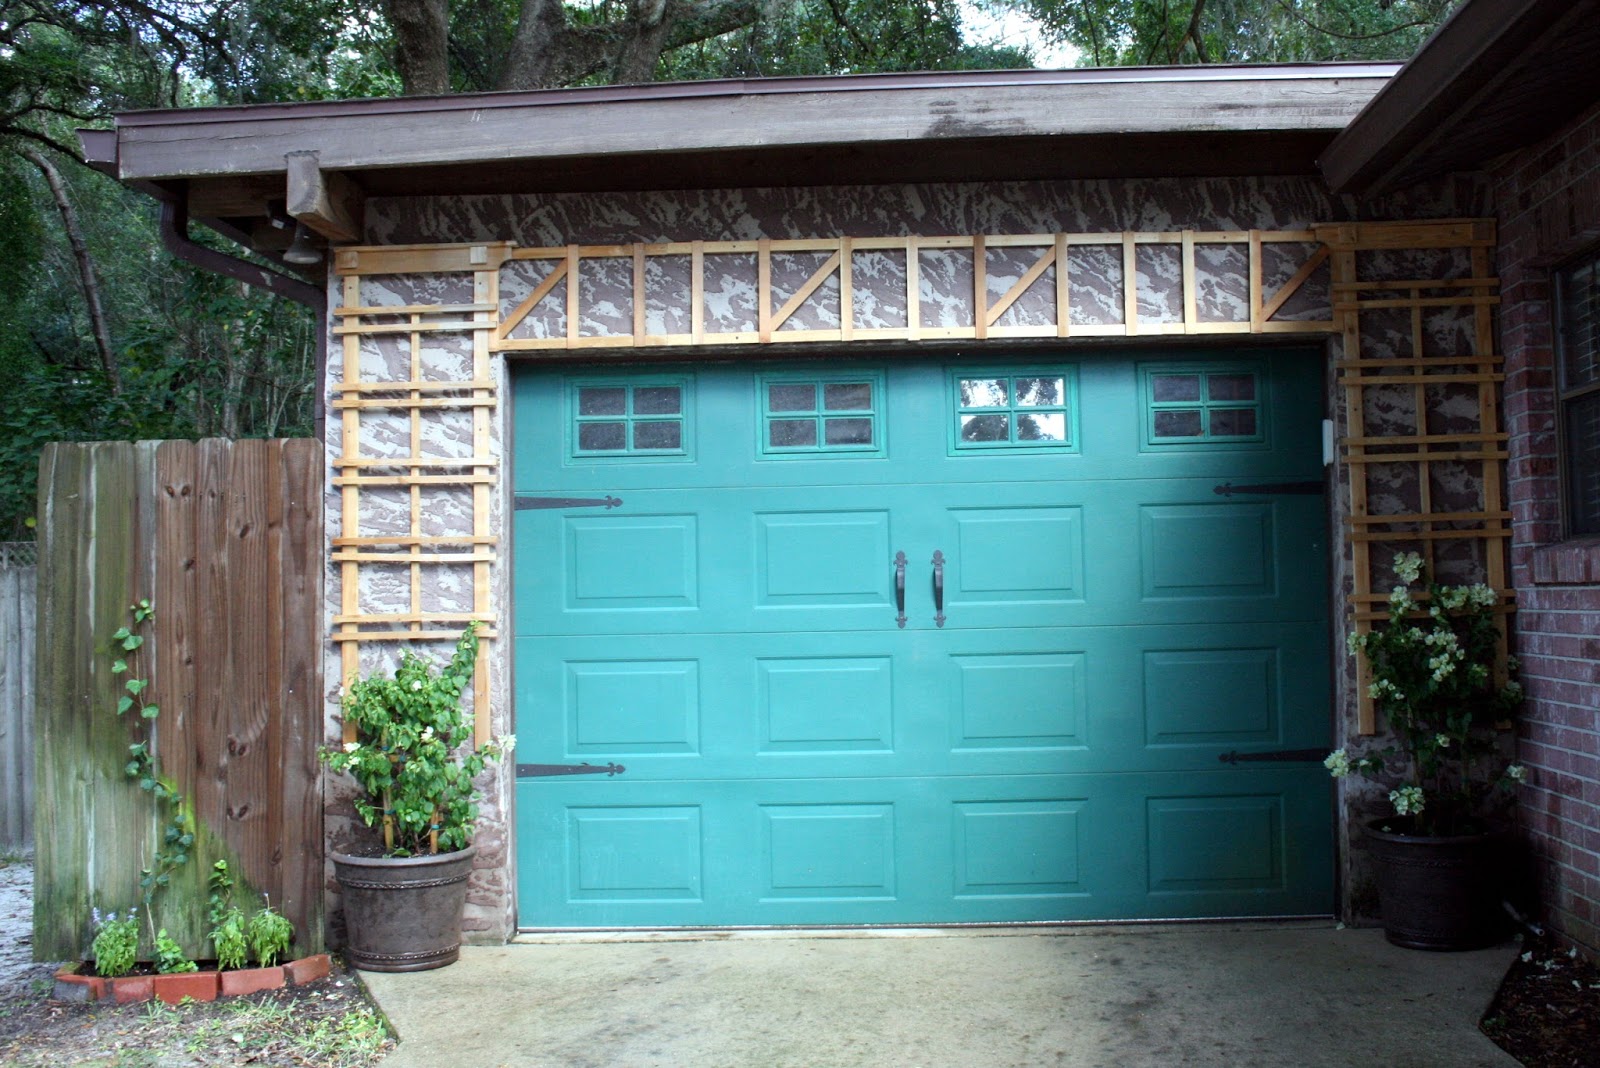
And then my brother and sister-in-law were in on another of my hair-brained ideas...the trellis over the garage door. I get into a lot of trouble perusing Pinterest!

Every time I drive up this driveway, I smile. Believe it or not, by December these beauties were all the way up the trellises and going across the top. And then came the winter of 2017!! I didn't cover the bougainvilleas as I truly thought they were indestructible in Florida but, apparently not, as they froze all of the way back. The one on the right started coming back awhile ago but I really thought the other one was a goner...until I noticed some tiny little green leaves and it is now making a nice come back. Sadly, they are not even as tall as they were when we planted them but I am fertilizing and have high hopes!

And while we're here, another no-brainer favorite of mine is the addition of the garage door "hardware". So inexpensive but I just love the detail it adds.


As you can probably tell, I could go on and on...I HAVE gone on and on! But I really love doing these projects around my home. They keep me busy...but not necessarily out of trouble! Which brings me to my next post. Yes, I already have it planned. It will be entitled "50 Shades of Gray". Intrigued yet? Come back soon and stay tuned.


Monday, May 7, 2018

A Few of My Favorites-Part 2

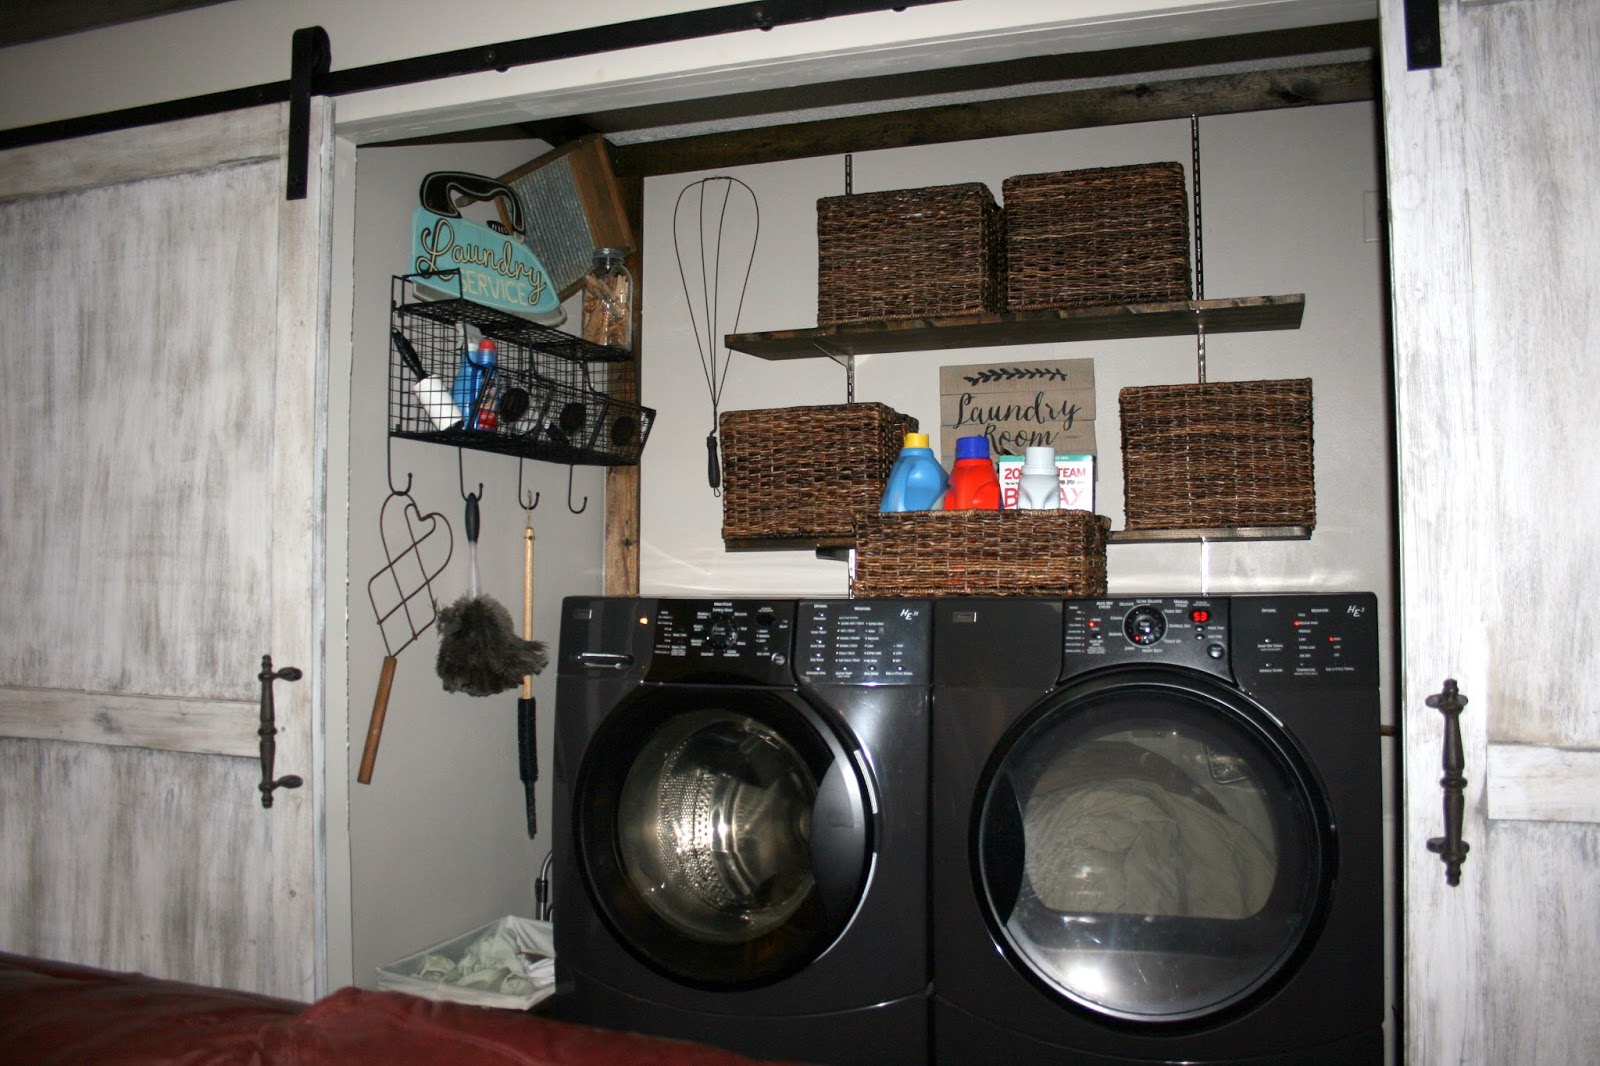
OK, so my next favorite thing (although I really can't put any of these in order - I'm posting about them because I love them all ) is my "laundry room" reno" with those fabulous barn doors. I LOVE these doors so much. My heart truly skips a beat every time I walk into the family room...and forget about opening them and seeing the "laundry"! SIGHHHH


I love this project because it really was done on a budget - except, of course, for the hardware...which was a gift from our girls! We just bought inexpensive 1X4s and a good quality plywood and went to work. Thank goodness for help from my brother and sister-in-law - especially when it came to the measuring and planning out - never my forte!! Again, except for the hanging of the hardware - which did take a professional because of the size and weight of this project - this project took about a day and a half from buying the wood to hanging the doors! I CAN NOT even begin to tell you how much I LOVE sliding these things open and closed compared to the bi-folds that used to be here and constricted my movement when using the washer or dryer and consistently fell on me if I even gave them the slightest "nudge".


Then, after I had these beauties on the outside, I could no longer handle the "ugly" of the inside. Again, I spent very little more than a LOT of sweat equity on this re-do and I can almost say that I now enjoy doing my wash!

Since this family room was once our garage, the washer and dryer were already at home here. We did look into building a new laundry room but since that would have involved removing yet more huge oak trees as well as MUCH plumbing, we decided we could live with it where it was. And now that it is so much prettier, I couldn't be happier! Again, another fairly simple DIY project!


Here is what it looks like today adorned with the antique rug beaters and wash board gifted me by my SIL. EVERY time I open these doors, I smile!!


And speaking of another simple, inexpensive re-do that happened almost without me thinking about it...as I recall, it was a Saturday morning and my husband was off to work. I was just itching for a project and remembered something I had seen on Pinterest. Everyone was posting about framing their old "builder's" bathroom mirrors...and boy did we have a big one. It was the entire length of our double vanity in the main bathroom that all three of our girls shared. I had already removed the single vanity sized mirror in our master bath and replaced it with a pretty hanging mirror but this one was so big and so tightly adhered that I was afraid that if I just yanked it off, I would need some extensive dry wall repair...and that wasn't in my budget 0f $0.

And so, off to the garage I went. I literally found wood and molding left over from some other project, a can of stain and a tube of silicon adhesive. Yep, that was all it took! And we went from this:


Look closely and you will see my very "professional" method of holding the frame up while the glue dried. At least I used decorating books. Lol


To this:


This project literally cost nothing - again, just things I had around and my time. And, I think, made a huge difference.

While we are talking about no-cost projects, my signs come into mind. Almost every one of these signs was made from wood I had around or very inexpensive purchases. I know I have more but these are the ones that came most quickly to mind!


Can you tell I not only love a sign but a free project as well?! And, of course there are the porch signs:


Thanks to Pinterest and PB  and Ballard Design and Grandin Road catalogs, I almost always have some inspiration. As you know, I love my projects and ones that don't break the bank are even better! I'm going to stop this post now as I find I have many more "favorite things" to share. But they will be for another day. Stay tuned.

Sunday, May 6, 2018

A Few of My Favorite Things!

O.K. So if you have been a follower of this blog for any time at all, you know that I like a project...or a holiday...or a craft...or just ANYTHING to keep me busy. And, because there is no "decorating" holiday this month and I have ALREADY crafted for 4th of July and I have already shown you all (well, there might be a tad bit more) of the spring decor, I found myself doing some reflecting this morning. I was putting on some wash and putting clean dishes away - definitely not blog worthy subjects - USUALLY! Until, that is, when I realized how much I love my barn doors and my cutting board holder...and then I realized how much I really love some of the simplest things I've done around here to make my nest a little more cozy and comfy!

And, some of the projects weren't all that simple but they are all things I have done - some times with the help of my wonderful family who humor me when needed - and the projects not only make my life prettier but some times serve a valuable purpose as well. And so, I hit my digital photos to see what I could find. Ready for a trip down Memory Lane?

Let's start with a BIGGIE - my kitchen!! I NEVER liked the cabinets in our kitchen. They were a walnut colored Formica with decorative groves of avocado green. We bought this house brand new in 1973. EVERYTHING in the kitchen was avocado green. It was one of the colors of the year. Just an aside, one of our bathrooms was the other color (harvest gold) and I am happy to say that has been gone for a long time too.

In any case, as happens around here a lot, I suddenly look at something I have looked at for a long time and can't bear it a second longer! That is what happened with the kitchen. I approached my husband about doing something about those horrible cabinets and I got the answer I got many, many times - "as long as it doesn't cost a lot". And that was all I needed.

Obviously, hiring a contractor was out! Even replacing all of the cabinets was out! And so it was up to me! It was a long project. I bought inexpensive lathing and used it to cover those hideous grooves. Come to think of it, that was when I bought my miter saw as well and it and I have had many adventures since! Then I found a brand new product that allowed one to actually paint on Formica without the paint peeling off. I did such a good job (if I do say so myself - Lol) on the cabinets that we ended up having a pantry built and added on, got rid if the avocado green counter tops, added a sunlight and recessed lighting, built in the microwave and have swapped out every appliance several times over the years. I wasn't blogging back then - in fact, there was no such thing - and for some reason, I didn't document the journey with pictures but, I did find these old pictures with the kitchen in the background to give you a jumping off point. By the time this picture was taken, I had added the lovely Z-Brick back splash, wallpaper and border, painted the groves country red instead of avocado green and changed the original chandelier (which my husband kept hitting his head on) for that beautiful fluorescent fixture...on which I immediately hung not only copper pots but baskets full of baby's breath!


Here's a picture of how the cabinets were coming along. It looks like I have the area above the cabinets STUFFED with stuff. I will admit, there is a lot but if you look closely you might be able to see that I had put up a new wall border of plates and bottles that I guess I was trying to mimic with all of that STUFF!


And here we are today. If you look closely, you can see that I have since changed out the hinges and hardware, added the ball feet and wood applique to the sink area, added the crown to the top of the cabinets and, of course, the pantry to the front left of the picture.

Here's what that area looks like now.


And here is the rest of the kitchen.


I really do like my kitchen and I am pretty proud of my accomplishment. Of course, if I were doing it today, I would have simply had the cabinet above the stove moved up for the microwave to be installed. The difference in cabinet height just wasn't thought of back then so I had a friend cut off the bottom of the cabinet and wire in the microwave. And, I am just starting to think about re-doing the cabinets...just re-painting them. It is definitely time for a touch up so I think I might try chalk paint this time. I have worked with it before and I love it. Just haven't had time to decide if I will go with white again or add a bit of color. Believe me, with the dearth of projects this time of year, that is the ONLY reason I haven't rushed full steam ahead as I usually do. But, it won't be long!

When I started this post LONG ago, I said something about being spurred on by putting away clean dishes. Here is another of my projects that I still adore! This is actually my very first Pinterest project. It is the cutting board holder made out of some of my left over lathing and a small piece of 1X2. And, once I started to get organized, there was no stopping me so I added some pull out shelves that I got at Lowes.


And since I still needed more storage for cookie sheets, baking pans, etc., I used this space...


...to hide all of this!


I have so many more "likes" to share but since this is already crazy long, I will stop for today. I know you're on the edge of your seat but I'll be back soon. Stay tuned.