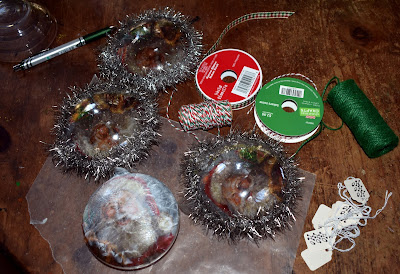
I finally got a chance to run out for just a few quick stops and I managed to get most of what I thought I needed for at least a few things I want to do. I will say that the stores really are already picked over. I needed large, flat, clear ornaments for one craft. I knew HL had them...HAD being the operative word. I was able to get one box. As tired as I was and as much as I did NOT want to fight the really crowded stores, parking lots and roads, I was panicking a bit about not having anything "Christmas" done yet so I did forge on to Michaels. They did not have the same ornaments but they did have some in plastic...and, honestly, unless you tape on them you really can't tell the difference. If the truth be told, I would probably have gone for all plastic but, I had what I had!
I had to do a bit of running before I even got the ornaments because I had a vision of what I wanted to do and that vision called for a vintage Santa head napkin. They were not as easy to find as I hoped but, after trying the usual places that I find "nice" napkins, I found some at Burlington Coat Factory...not my favorite place and I think this is actually the only time I have been there since their opening week many years ago!
Of course, while I was out I found a few other things I might want or need so I now have a bit of a Christmas stash going.
I grabbed what I needed for what I thought would be the "easiest" of my Christmas crafts. Boy was I wrong!
This craft was supposed to be simple decoupage of a napkin on to the back of the ornament. I have done napkin decoupage before but maybe not on glass because I have never had this much trouble. I know that sometimes just getting the back of the napkins off and down to just the one ply of the picture can be a chore and these napkins were true to that thought. Most of the nicer napkins are 3 ply and very, very thin. I really struggled with the first one until I realized that since I was only using the head, I could actually cut in a bit and not have to deal with the edges that are sealed together.
Once I got this figured out, I decided to try a new technique that I have seen others use. Instead of cutting the image, many bloggers use water to "draw" their shape and then just pull off the residue. I don't know what I did wrong, but this method didn't work for me. The water bled but I was able to rip the shape I wanted...so far, so good. But then, I assume I would have had to wait for it to dry and no one else had done that so I tried to lift the image on to the ornament that had a thin coat of ModPodge but, that was when things fell apart. There was no way I could even pat the image on to the ornament without it tearing everywhere and, since you are putting a flat image on a rounded surface, "patting" in place must happen. In any case, that one got washed off and I started again. This time I traced around a bowl that seemed to be the right size. But, I still had issues as my OCD self really didn't want any wrinkles and just a slightly too aggressive "pat" would rip the image. And so, that one got washed off.
At this point, I kind of got the knack of it and got three of the napkins on to the ornaments and then sprinkled with a fine clear glitter before the ModPodge dried. I was rolling right along and ready to start #4 when I picked up the first one and realized that while the glitter looks nice from the back, when you look at Santa's image through the front of the ornament, it looks like he is full of freckles. Lol I think the ModPodge is dry and that is how it will stay but, I am taking a break and I will be a little more patient before I decide if I have to wash all of these off and start all over again. Yikes!!
I am back a number of hours later. Boy did I come close to washing the three I had done completely off but I decided that if I could just brush a bit of the glitter off of Santa's skin, the rest was fine. And, so I did and, so it is!
I went ahead and did the last ones without the glitter and then I am just going to glitter up the fur and beard. My initial plan had been to do a line of glitter trim around the image but then I decided to use my beautiful vintage tinsel that I just ordered. It is so pretty and sets off the Santa just right. Then, I am adding a little hang tag and some strips of ribbon and baker's twine.
I still only have one done. The others are in varied states of readiness but I am done for today. This ornament was difficult to photograph but he's cute and I am happy with the way he turned out.
My next few days are pretty full but I am hoping to get these done and be ready to move on to the next. Stay safe and stay tuned.


No comments:
Post a Comment