decorating with dodi

Follow on Bloglovin

Thursday, April 30, 2020

Filling My Days!

When I lasted posted, I told you I was looking for things to keep me busy. Well, before I could get totally bored, I heard from daughter #2. She invited me up to her home this weekend for a small celebration in honor of grand daughter #3 who is graduating summa cum laude with honors distinctions ( wow, that's a mouthful...and in just three years no less ) but who will not be having a ceremony because of the virus. This will be the first time we will see each other since my 8 plus weeks of isolation...and we will be distancing and being safe. It is also the afternoon where we will view grand daughter #2's virtual ceremony as she graduates from FSU. Of course, this is not how we had expected these milestones to be celebrated but, it is what it is and we are just so thankful that everyone in our family has been safe and healthy through these trying times that we are not dwelling on the negative.

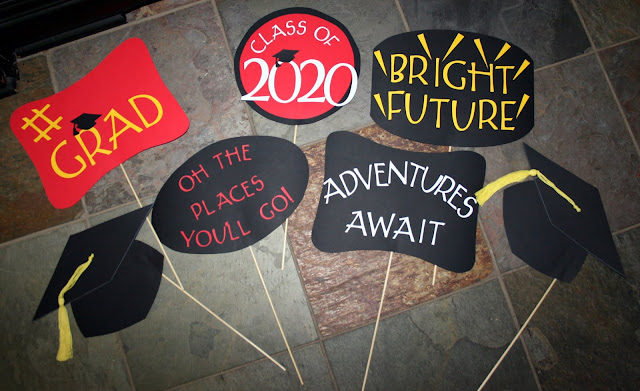
In any case, she asked me if I could come up with a banner and some photo props. "No problem" I say as this is right up my alley. Except that I can't get to any stores to buy supplies and I am still out of printer ink so there will not be any printing of things.

And so, I went old school. I pulled out all of my old machines and went to town. Morgan is graduating from Flagler and their colors are crimson and gold. I didn't have the exact colors of card stock but some close enough...at least for the banner. I actually had EXACTLY the right number of crimsons to cut the letters...until...the Cricut machine snagged and mis-cut the M. I was just about to cut some scraps to piece it together when I realized I could cover the big gap with a mortar board...and I even had a gold tassel to make it even cuter! Sometimes ideas are truly born of necessity. No one would ever guess the mess hiding under that mortar board. Lol


I wanted to make the pennants on the banner in the shape of the Flagler logo and thought I should give a nod to the logo as well. Boy do I wish my printer had been working. That lion would have been so much easier if I could have just printed him and cut him out. I ended up drawing him from the image and cutting him out. He's not perfect but I don't think anyone will care.


 I had planned to do just one lion and put him between the two words but, when I saw how long this would end up, I decided to make it two lines and then it was just crying for a lion at each end.


I still have to figure out how I want to string this together so it hangs correctly but, that will be for tomorrow.

Day 2 I started on the props. I was now out of anything resembling crimson and gold so it was on to red and yellow!

Somehow, I ended up wanting to use lots of words. My initial thought was to just use paint pens and write the words but, for whatever reason, that just didn't look special enough for this special occasion and so, out came the Cricut. And, when it became evident that a lot of these letters were going to have to be very small, out came the Xyron machines for the adhesive. Let's just say that the lettering was a job! Some "words" may or may not have been uttered. Even using the Xyrons, there was extra adhesive everywhere but, in the end, I am loving how they turned out and I hope we get lots of really cute pictures because I will definitely be back to share them if we do!


It is now after five and I am tired and ready to call it a day...except that as the days went on, my usual organized self began to just pull things out without putting other things away and I am left with this:


And seriously, that isn't even all of it. I just kind of got on a roll and didn't look back. Oh well...there is still tomorrow. I have to make a few graduation cards as well so, no sense putting all of this away just to take it all out again. For now, I think I will try to just "let it go"! Stay safe and stay tuned.


Wednesday, April 29, 2020

Looking Back!

I think I have shared that I am having trouble finding new ideas that I want to make to add to my 4th of July decor. Everything that I found that I like, I have pretty much done...and so, that inspired this trip down memory lane and a reminder to myself of past 4th projects.

I still love my vintage fire cracker that I made so, so many years ago.  The flag is a downloaded print of a chalkboard drawing.


And then there is the "Bethany Lowe" knock off banner that I saw in a catalog somewhere but the price was way too high so I decided to whip one up myself. It was many "stepped" and took forever but I loved it so I was fine with that. Then, one day a few years later I happened to be in my favorite store in Micanopy where many Bethany Lowe holiday things are carried and you can imagine my surprise when I spied the banner...except that instead of the large one I had made, the original that I thought I was copying was actually miniature and made for a small tree. Of course, in my book, that made the high price even more absurd! And, I liked mine way better!!


This little flag picture was a free printable from a blog and so easy to put together.


The number 4 is nothing more than a papier mache' number decoupaged with a patriotic napkin and tied with some baker's twine.


This wreath was simple to make as it is mostly 4th of July picks from HL on a grape vine wreath and tied up with a patriotic bow.


I still really like my Pledge of Allegiance. It is just a flag from Michaels that I tea dyed and then wrote the words to the Pledge on the white stripes.


I still can't believe that I got these cuties made. I had ripped this idea out of a Martha Stewart magazine a long time ago. When I finally decided to make them as gifts, I headed to Lowes and found out just how expensive ball feet could be...and so, I tabled the project. Fast forward to daughter #3 taking us up to the "Fancy Flea" for Mother's Day - a year or so later - and me spying a large tub of old ball feet. They still weren't inexpensive but I liked the idea of them being old. They came off of old wardrobes from an old hotel...SOLD! Then, it was simply a matter of gathering and cutting the rest of the wood and, voila! I still love mine!


I made Uncle Sam with my grand kids. He was so easy that theirs all look better than mine.


I made the Bingo card back when I was obsessed with ephemera. I think I made one for about every holiday.


Daughter #1 actually made this for me. I think it was another Martha idea. She just ripped some brown Kraft paper, painted the flag, crumbled it a bit and then stained over it all.


My 4 oldest grand daughters and I made these 2X4 picture holders one year. They actually look better when they have a picture clipped to the clothes pin.


My Uncle Sam burlap door hanger is still a favorite.


Hudson, Presley and I each made a canvas flag a few years ago and then the 4 oldest and I did the sand art candles a long time ago.


I made these bead board flags as gifts one year and it is still the main focus of my mantle all these years later.


This is another of my $2.50 HL pillow covers. I really had fun doing this one and love the way it turned out.


Here is the paint stirrer star I made last year when everyone was doing the stir stick crafts...and I had no other brilliant ideas back then either so I gave it a try. This is definitely not a favorite but it can always be nestled into some empty space and look cute.


I made the fire crackers from dowels, scrapbook paper, wire and wood stars a long time ago.
 

This is another craft that my older grand daughters and I did. One year we made one as gifts for almost every holiday all year long. We just glued together the letters from HL, decoupaged them with scrapbook paper and then stamped them and embellished any way we wanted.


This was another Bethany Lowe knock off and took us forever to make but we loved them when we were done. It definitely reads as primitive.


Another simple napkin decoupaged on to a wood star and then sprinkled with clear glitter.


This is always one of my most "pinned" projects every year. Daughter #3 gifted me with the original wreath using her three children's hand prints. I later took it apart and laminated all those little hands so it would last forever and, so far, it has!


Another favorite...napkin and tissue paper decoupaged plate.


A variation on the flower pot picture holder.


And, another plate. This time I printed vintage 4th images and decoupaged them first and then covered the rest of the plate with red tissue and edged the rim in gold.


And lastly, a pillow cover that I made as gifts and then painted with the flag. If I remember correctly, I knocked this one off of a PB pillow that year.


Holy cow! That is a lot of red, white and blue. Do you see why I am having trouble coming up with new ideas? Looks like maybe I will have to take an old idea and figure out how to tweak it...everything old is new again! Stay safe and stay tuned.

Sunday, April 26, 2020

Needing Some Inspiration

You know how much I love to craft. It has been my salvation the last six weeks. But now, I find myself out of inspiration...with dwindling supplies as well. I know that a lot of the craft sites that I follow are resorting to making things from repurposed things in their homes and yards but, alas, that is not the kind of crafter I am...or have ever been. Even way back with my GS troops on very limited budgets, I kind of always felt that if something was worth making, it was worth making in a way that it could be used. I'm not good at the toilet paper roll, stick, tin can kind of crafting. Believe me, I wish I was...especially looking at another month of isolation!

I have looked at lots and lots of ideas. Right about now I'm searching for things to add to my 4th of July decor when that comes out - and, by the way - that might just be sooner than later as it will give me something to do and I do love my vintage 4th decorations! But, I digress.

So, today is Sunday and I have decided to post the next spring decor visit and then maybe go watch a few of my favorite old movies. I will give myself permission to take a whole day "off" and then come out blazing tomorrow.

Before I change my mind, let's head to the family room.


I think I used all of the rest of the garden elements that I have in this room.


I moved this stack of book pages from the living room to here. Daughter #3 bought these for me at Ballard Design many, many years ago. I remember when she gave them to me that there were a number of questioning looks. They are, after all, just old book pages faced with pretty images and tied with twine...kind of the fore runner of the stamped, stacked books everyone - including me - is doing these days. I have actually loved them from the minute I got them and they have almost always been out in one vignette or another since the day I got them. I did print some new cover pages on red card stock and I use those for the holidays calling for red.


 And, when I had just one more little nest with no home, I decided to place it here...and, I love it.


I also love this vignette. I love how the basket mimics the bike basket on the sign and how the flowers and garden hat kind of look the same as well. I was going to do a bit of an update on the mantle this year but, since I can't get out to look and purchase, I guess that will have to wait until next year.


As much as I do not enjoy shopping online - I am more of a tactile person and like to see what I am getting up close and personal - I do give in now and then. Can you tell who the new kid on the block is in the shelf area?


That was probably a pretty easy guess if you've been a follower for any time at all. This "little" beauty has most of the things I am drawn to. We all know I love urns of any kind and if they are chippy and distressed, all the better.


When I saw this at Decor Steals, I knew I had to have it. I just didn't know where it would go but, with my penchant for decorating with pots and urns, it was a safe bet I would have no trouble moving it to many places. Until it arrived. In the first place, it is way larger than I thought it would be...which is fabulous.

It is literally too wide for many narrow shelves or spaces and so, just for what I thought would be a moment, I put it up in the TV armoire shelves. And then, I realized that it just might have found its permanent home. Not many things have a permanent home around here. For me, part of the fun of decorating is moving things around. But, these shelves are deep and dark. I knew right away that I should find some permanent items that are light in color so they will pop...and then just leave them there and add in bits of holiday and seasonal as needed.

And so, until something new comes along, this guy has found his "forever" home. I can actually see it filled with flowers, leaves, holly, etc. but that will have to wait until the stores are open again.


And here is where the bee skep ended up. Seems like I made that so long ago!


Since I really did just minimum spring decor in the bathrooms, I decided to just throw in this one picture and call it a day.


Spring is definitely at a minimun...but, I guess that is how it should be. It feels lighter and airier and cleaner...but, that can't last for long! I am chomping at the bit to start getting out the 4th. Maybe I could call it Memorial Day decor? We shall see. Stay safe and stay tuned.

Thursday, April 23, 2020

And Just That Fast!

I woke up this morning and, as usual, after my morning coffee and newspaper, I begin to think about what I would like to do. Staying busy is more important than ever these days, so I try to make quite a stacked list. Mind you, they're not all things that I would be sad if they weren't accomplished...if I have things like that, they go to the head of the list and I almost always get to them.

Today my list was no different...just a lot of things to keep me busy, none of which were vital. After getting dressed, I usually also check my computer just to see if I missed anything important. Again, today was no different - with the exception that before I got moving, I decided to check Pinterest for any new and exciting craft ideas...and today I was looking at 4th of July.

Most of the things I found were either things I have already done (remember, I've been at this crafting game a very long time - lol), things I had no interest in doing or things that I didn't currently have the supplies to do. But then, one thing hit my eye. It came from an Etsy store from Southern Country Decor. It mostly caught my eye because it was made from 4X4s and I still had a few leftover pieces from when I made the rustic pumpkins in the fall - and the bunny for Easter. And that was all it took to get me gathering up my supplies!


This was a super easy project. The hardest part was drilling the hole into the middle of the top because this was pressure treated wood and the rings were tight! Because the drill bit kept slipping I decided to start by hammering a nail hole and then enlarging that with my nail set. Once I had an opening large enough for the tip of the bit, it was clear sailing. I just realized that I could have accomplished the same result by starting with a small bit and changing to a larger one as I went but, I think my idea was easier. Lol


 The second most difficult thing was getting the backing off of the Contact paper stars. I finally grabbed a hat pin and that made the job a bit easier.


I would have loved to have had red, white and blue chalk paint. That is the perfect finish for this project. But, I only have white and hardly any of that. And so, I decided to use acrylic and water it down so as to give just a bit of a wahsed effect.

I started by painting all three in white so I would have that color as a background for the stars and stripes. I taped off the stripes with painter's tape.


As soon as I finished painting the red stripes, I realized that the paint was probably running under the tape as the wood was very rough and the tape just wasn't holding that tight. Nothing to do now but wait and see.


Unfortunately, I was correct. Luckily, as is so often the case these days, this project is supposed to be shabby...not quite this shabby, but shabby non-the-less. It was an easy fix with a touch up using the white chalk paint that I had. That stuff covers everything in one coat.


I cut stars out of the Contact paper and adhered them to the middle sized wood. The Contact paper made a much better seal and I also didn't water down the blue paint as much.


This one turned out great on the first try.


Once the paint was dry, I went over each of them with the Waverly antique wax. I like the distressed look this stuff gives and it is super fun to work with. I just dry brush it on and then use a dampp rag to blend and remove the excess. It gets down into crevices and leaves a worn look which I like.


The last step was cutting and gluing in some pieces of thick jute twine. I unraveled them to give a bit of a "sparkler" effect. And then I tied a length of thinner twine around the plain white one.

I really like how this turned out. I wish I had more of the 4X4s so I could make sets of these as gifts. I do have one small piece and one tall piece left...hmmmmm??


Stay safe and stay tuned.